For quick contact: +90 532 288 2200


Evaluate gloss on the production fabric, check the motif at actual size and prepare a repeat, sample and quantity brief for lacquer-effect printing.
Lacquer-effect printing gives selected areas of a textile design a glossy surface. A stripe on a jacket may catch a narrow highlight when the fabric hangs freely. The same stripe can look broader when the wearer moves or the sleeve bends. Sample approval therefore starts with two descriptions: where the gloss should sit in the motif and what the fabric will be doing in the finished product. A colour swatch gives the team a common reference for the ground. The treatment also needs to be seen in the direction and light in which it will be worn. See sample and order requirements.
Separate the areas that should receive gloss in the artwork. If a glossy shape must sit inside a printed colour, show the distance to the colour boundary at actual size. For example, two shiny bars that look well separated in a magnified artwork preview may appear to meet when the cloth is folded. A strip that crosses a seam can lose part of its visible width in construction. Draw the intended boundary and mark which edges or gaps should stay open. A small clipping of a physical reference can help communicate the level of shine while the printer prepares a trial on the actual base.
A calendered sheen can come from smoothing fabric under roller pressure. When a supplier quotes a gloss or lacquer finish, ask which process and which areas the trial covers. For an all-over effect, compare the centre with both usable edges under the same light. For selective lacquer-effect printing, mark the glossy boundary and the matt ground on the artwork. Keep a handling margin on the cutting, label its intended face and check any reverse that will show at a cuff or pocket.
Lacquer-effect printing calls attention to how the shiny area interacts with the base. Foil can introduce a metallic colour and changes in reflection as the cloth turns. Dew-Drop printing calls for checking the spacing and shape of discrete droplets. Embossing introduces raised or recessed forms, which a side light can make easier to see. If two approaches suit the same design, ask for the motif in the same size and position on the same fabric. Compare the effect on the flat cloth and on a piece shaped as it will be in the garment. Foil printing on fabric · Fabric embossing on polyester.
Consider whether the visual reference shows an effect or a complete construction. A photograph of a shiny sleeve may also show how a curved panel, seam and underlying material support the surface. A sample applied to a flat square can answer questions about colour and edge definition. A sewn panel helps answer what happens when the motif wraps around the sleeve. The general printing guide compares these decisions with the choice of the base printing method. Fabric printing methods.
Record the fibre blend, the knit or weave construction, the weight and any existing finish. A dark smooth fabric and a dark textured one can give the same glossy shape a different outline. Compare an untreated clipping with a treated one from the same lot. Check how the surface looks where the cloth changes direction, and feel the larger filled area as well as a fine printed line. On a lightweight fabric, hold the two pieces in the same direction when you compare drape. Otherwise the comparison may capture the difference between directions in the material.
When a customer supplies more than one roll or colour, label the cuts with the roll or lot number before dispatch. For a design offered on navy and black, include both grounds in the trial if the balance of shine is important to both colours. Examine the grounds before the decoration goes on. Keep the approved reference and document which incoming lot it belongs to. A familiar fabric name is most useful when it is accompanied by a code the cutting team can find on the roll.
Supply the repeat dimensions in physical units and identify the direction along the roll. Include shared registration points when the glossy motif follows part of a print. Place a reference at an easily recognisable line or corner so it can be checked after both operations. If two files describe those operations, keep their scale, origin and revision date consistent. Ask the printer to include a repeat join and the smallest important gap on the sample. This helps reveal an overlap or an interruption that may be hard to see in a cropped preview.
Place the print beside the pattern piece when comparing the finished width. A motif near the outside of a usable width might appear on a seam allowance or be cut away in production. Show the sewing line and the cutting line as separate marks. If a repeat crosses the seam, decide which point must line up and check the matching cut pieces together. Where the motif wraps around a fold, mark the area that will usually be in view.
When a glossy motif sits over a colour print, describe the order the sample will follow. Retain an untreated cutting, a cutting with the base print and a piece with the complete treatment. Inspect the area where the gloss joins the printed edge on each piece. Record the direction of the cloth and the revision of both files. If the boundary has moved, these three reference pieces let the team locate the stage where it changed and explain the adjustment clearly.
Start with the fabric flat on a table. Look at the same motif straight on and then move your view to the side without changing the light source. For your third view, place the fabric on a form or fold it in the direction required by the design. Compare the narrowest line and the largest glossy shape at each position. Note where the base colour appears darker, where a highlight breaks and where the outline becomes harder to read. Leave a small untreated area in your sample so the surface has a reference nearby.
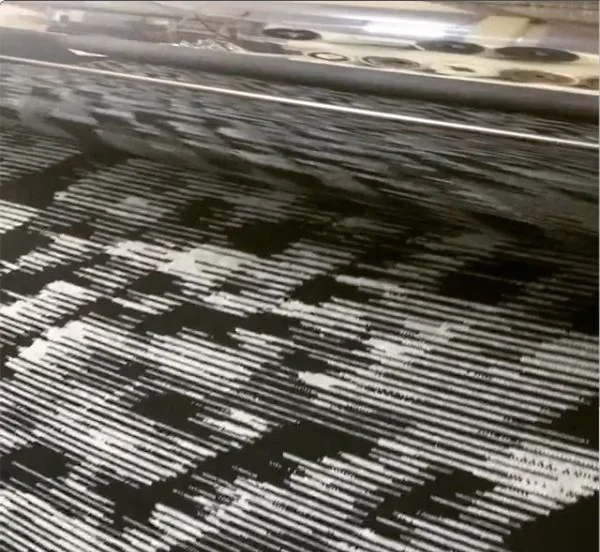
The photograph accompanying this guide is a frame from an Ünlü Transfer production video. It shows bright lines against dark fabric passing beneath a roller. The image records how the effect looked from one viewing position. For an approval set, take a front view and an angled view under comparable lighting. Keep the distance and exposure close. Place the sample code in the photograph or record it next to the file. The physical fabric remains the comparison point when the production team reviews the first roll. Ünlü Transfer lacquer printing listing.
Hold the treated and untreated pieces in the same direction and bend them around the same curve. Watch how the fold recovers after you release it. Inspect a seam or corner at the places with the most layers. A glossy effect across the edge of a pocket may behave differently from the same motif in the middle of a broad panel. Use the intended lining, thread and sewing direction in that check when possible. Add a note to the approval card for any patch that needs to recover or lie flat after wear.
State the intended care before approving the trial. You may need separate observations for changes to appearance, rubbing against a pale lining and recovery after folding. Agree the conditions, test method where one is requested and the acceptance criteria with the supplier. Record where the change occurs and which material it affected. An observation labelled “after care” is easier to interpret when the record says how the sample was treated and what it was compared with. Ask the person who will approve revisions to identify which observation calls for a change.
Discuss whether the order will arrive on rolls or folded. If two treated faces will rest against each other, try the intended arrangement on a sample first. Write down the contact position and the time the material was held. Open the sample and inspect the shine and any marks along the fold. For a roll, note the face that should wind outwards and how the usable edges will be identified. Keep the cutting reference apart from a sample intended for a care check. A labelled spare can help the team evaluate a later delivery against the same agreed result.
Ünlü Transfer’s lacquer printing listing gives at least 50% polyester, a maximum processing width of 180 cm, a 3-metre minimum sample and a 50-metre minimum order. It lists 3 days for a sample and a 7-day lead time. Confirm fabric suitability, usable cutting width and dates for your project.
Send the fabric specification, lot, end use and artwork revision at actual size. Mark the glossy areas. Give the input and usable finished metres, the width required and who will supply the cloth.
For example, two pieces measuring 70 centimetres each will sit side by side on a usable 145-centimetre width. A 138-centimetre usable width requires a different layout. Quotes for the same input length can therefore produce different cutting results. Share the same layout with each supplier so the comparison is based on the same output. Include the target approval date and the date you need the finished cloth. State which colours or patterns belong to which quantity, especially when one design will be repeated on several bases.
Suppose you want spaced glossy lines on a dark woven jacket with a pale lining. State the fabric lot, usable width and an 18-centimetre repeat. Ask for a cut that shows the finest line, a repeat join and the pocket seam. Include the untreated fabric and the intended lining as comparison pieces. Look at the coat front straight on and with the fabric curved. Check where the stripe enters the seam allowance and what is visible after assembly. Use the intended care and contact checks to record whether that configuration is suitable for the order.
Keep the approved fabric cutting and the final artwork revision together. If a change in pocket size narrows the gap beside the motif, compare it on a cut piece before the production layout is confirmed. Send the revision number with the reference photograph. Give the people who will inspect the first metres a clear position and mark in the motif to use. Record who signed off the appearance and who checked the cutting requirement, so the next roll can be reviewed consistently.
Choose a cutting from an identifiable position on the roll. Compare the amount of shine, edge definition and the repeat join under the same lighting and fabric orientation. Confirm the fabric code and artwork revision before commenting on a difference. Add the roll number and the date to the comparison. If something changes close to a cutting edge, mark its position on the fabric and on the layout. This gives the purchasing, design and production teams the same point of reference when they discuss a revision or a repeat order.
For a new project, see Ünlü Group’s fabric surface treatments. Include your material, artwork, desired glossy areas and expected finished length when you request a sample review and quotation. An untreated clipping and a marked visual reference help define the first trial.
phone: +90 212 576 5250
fax: +90 212 493 0336
email: info@unlutransfer.com
Yenidoğan Mah. Eser Sok. No: 6-8
Bayrampaşa, 34030,
Istanbul / Turkey
TR 9150171175
Bayrampaşa Tax Office