For quick contact: +90 532 288 2200


Compare straight fabric pleats with sunray pleats, measure a production swatch and prepare a textile pleating quotation.
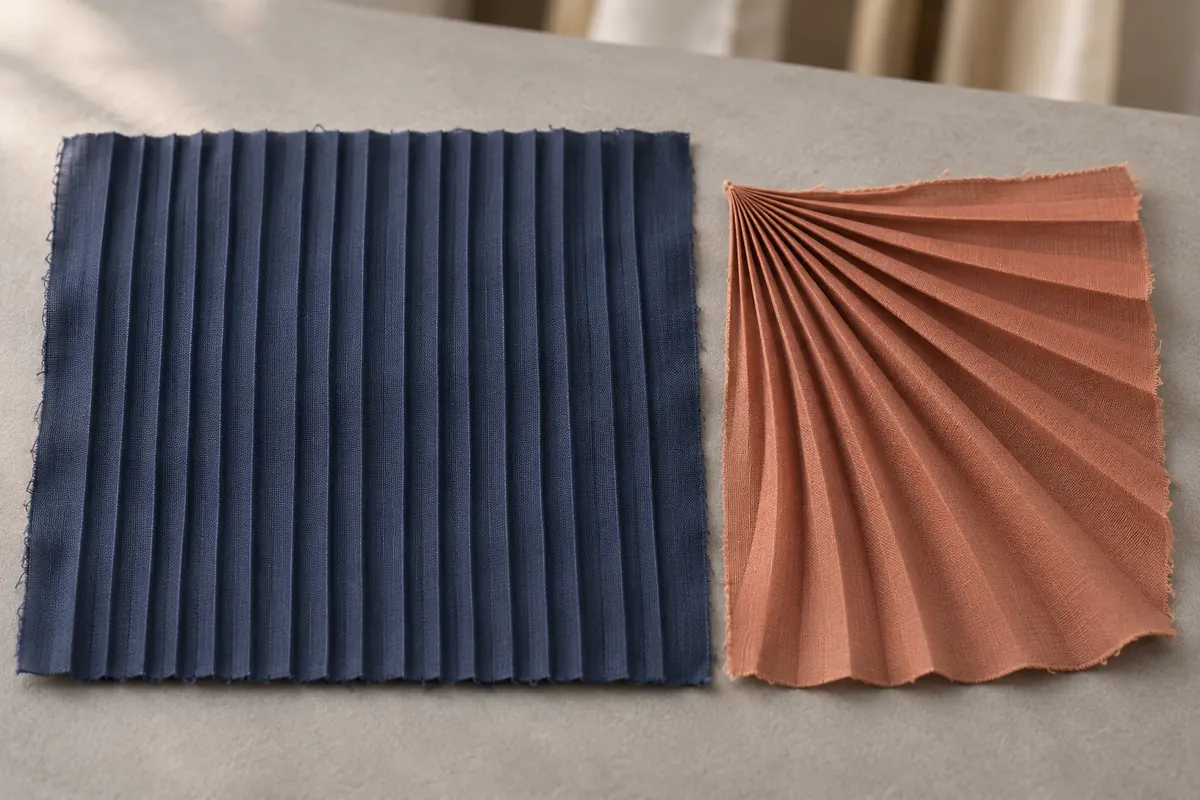
Fabric pleating by the metre and sunray pleating give a garment different shapes. Straight pleats run in parallel at regular intervals. In sunray pleating, the folds sit closer together at one edge and spread towards the other, like a fan. Before you order a sample, decide where the garment should sit close to the body, where it should open out and where its seams will meet the folds. The distinction also matters when ordering production. The width of the fabric on the roll and the usable width after pleating are two separate measurements.
Use this guide to choose a fold pattern, test it on the actual fabric and request a quotation based on dimensions you have checked. These steps apply to fashion teams developing a first silhouette and to production teams comparing quotations against an approved sample. For the available processes, see Ünlü Group’s fabric manipulation service in Bayrampaşa, Istanbul.
Start with straight pleating if the garment requires a regular fold pattern across yardage before cutting. On a skirt, parallel folds can produce long vertical lines. The same direction of pleat can read diagonally in another design if the pattern piece is placed at an angle. Mark the grain and the desired direction of the folds on a drawing. Include the intended direction on the worn garment as well as the orientation of the uncut fabric so that the sampling team can interpret the drawing correctly.
Show the expected fold spacing and indicate where the seams should meet the pleats. A seam joining two panels may fall on a crest or down inside a fold. Its position affects how the fold pattern continues across the two sides and how much bulk accumulates at the join. Try joining two small pleated pieces with the intended seam allowance. Check the alignment from the face of the fabric and feel the thickness from inside the garment. This can reveal a pattern change before you commit the roll to production.
Sunray pleating can create a narrow waist edge and a fuller hem. The change in spacing depends on the shape and dimensions of the panel. A skirt with more sweep at the hem needs a different drawing from a slimmer skirt with the same waist size. Provide a drawing to scale, indicating the narrow edge, the wide edge, the finished length, the grain line and the sewing lines. Show which part of the pattern is the reference where measurements may be taken either at the cut edge or at the seam.
If the garment includes several panel shapes, give each one its own reference. Record the dimensions of each shape and the quantity needed. At a fitting, review the sample flat before attaching it to the waistband, lining or adjacent panel. Then watch how it opens when the wearer moves. A sample with neat folds on a flat table can open more freely when the fabric hangs under its own weight. Use the movement of the full panel to judge the amount of fullness at the hem.
Start with the fibre percentages, fabric weight, woven or knitted construction and details of any print, coating or finish. Two polyester blends can give visibly different folds because their weights, structures and handles differ. Treat the fibre content as an input to the sample decision. Approve the appearance and the response to care on the actual fabric. If possible, cut the swatch from the production lot and keep a second piece from the same lot untreated so that you can compare the two.
When the fabric comes from several rolls, label the roll that supplied the sample and note any difference in shade, width or handle across the delivery. If purchasing has not placed the fabric order, record how the available sample differs from what you intend to buy. A change of finish or weight may require a repeat of some of the approval checks. On the sample, mark the face side, grain and the area where you will take measurements. Keep the label on the sample when it moves between design, cutting and production.
When the fabric folds, part of the pattern drops out of view. A large motif can lose its centre, or fine stripes can look closer together when seen from a distance. Select a swatch that includes at least one boundary between repeats, along with the parts of the design you most want to keep visible. Look at the swatch closed and at the degree of opening expected in wear. Use a fitting if the folds open or close differently once the sample is on the body.
If the pattern needs to join across a seam, mark the sewing line and the part of the motif that should continue. For example, a fine pale stripe that has to match at centre front needs a reference at the sewing line on both panels. A design based on larger, scattered motifs may allow more placement flexibility. Agree which motif or line matters before you assess the swatch. This gives the supplier a reference when discussing which changes to fold direction or pattern placement will improve the result.
Choose two points across the folds and mark them before processing. Measure between the marks on the unpleated fabric, with the cloth resting evenly on a table. After processing, measure the same distance with the fabric relaxed and the folds left closed in their natural position. Keep the usable pleated area separate from any uneven section near the edge. Pulling the folds open can increase the reading and give the cutting team more width on paper than it will be able to use.
Suppose the distance decreases from 60 centimetres to 30 centimetres. In the direction measured, the sample uses two units of input fabric for one finished unit. If the design calls for four finished metres in that direction, the theoretical input for this sample is eight metres. Add edge, cutting and sample allowances after checking the cutting plan. If the marks were across the width of the cloth, discuss how the measured width affects pattern nesting before applying the result to the length of the roll.
Repeat the measurement in the centre and in a representative area closer to the edge. If the figures differ, record whether you can see a change in fold spacing or an uneven edge. Leave the marks visible and photograph the measuring positions. Record the fabric lot, fold direction and both readings on the sample card so that someone in the cutting room can repeat the same measurement on the first delivery.
Record the finished length along the narrow edge and the wide edge separately. If a style uses several panel lengths, record the measurements against the corresponding panel code. When the matching point between panels falls between the two edges, mark an additional control point at a fixed height. That extra mark lets the cutting and sewing teams compare where the two folds meet during assembly.
Join a sample using the planned seam allowance and lining. Look for changes in fold direction at the side seam, along a zip and under the waistband. Point out exactly where a join is thicker than expected. If the seam causes the pleats to twist, compare the unsewn sample with the sewn section and check the pattern orientation before changing the fold itself. This helps the team decide whether to adjust the cut, the stitch line or the pleating.
Agree on the care conditions you expect to put on the garment label. Look at the sample before and after the proposed care procedure in similar light. Record the change in finished dimension and whether the folds have opened, softened or taken an unwanted mark. If colourways use fabrics with distinct constructions or finishes, choose representative variants for separate tests. Save the date, fabric lot and care conditions against the approved swatch for later comparison.
For straight fabric pleating, give the roll width and length, the fold direction and spacing, the composition and finish, and the finished width you need for cutting. For a sunray panel, send the scale drawing, finished dimensions at both edges, panel length, material details and total quantity. If you are supplying the fabric, specify how many rolls belong to each lot and whether you can provide a separate piece for sampling. Give the date by which you need to review the sample and the finished quantities required for the order.
Ask which steps the quotation covers. Sampling, preparation, pleating, optional panel cutting, packing and dispatch may be described separately. Confirm whether the price is per input metre, per finished metre or per panel. Compare offers at the same usable width, finished quantity and fold pattern. Two suppliers can quote for the same number of input metres while allowing different usable widths after processing. A quotation comparison should make that difference visible before you place an order.
Suppose a fashion team is developing a straight pleated skirt in a patterned cloth. The sample request includes the physical fabric, the fabric specification, the fold direction and a scale drawing that marks the seam line. It identifies a motif that should continue across the seam and shows the roll width to be checked. The brief also asks for the finished usable width on the approved fold so that the cutting team can update its layout.
At approval, the team measures across the relaxed folds, sews a short section of the planned join and compares the result after the intended care. They record the finished dimensions, the reference roll and the required piece count before requesting a production quotation. If the stripe misses the seam, mark its position on a photograph and say how far it needs to move. One precise change is easier for the sampling team to check than a general request to improve the look.
When the fold pattern is used across several sizes, show how the pattern is graded. In straight pleating, a wider panel can put the side seam on a different part of the fold. Test a small and a large size when the design requires a continuous line at the seam. For sunray pleats, match each panel code and finished edge measurement to its size. Use the approved dimensions and usable cutting width to work out the expected piece count. Agree where you will account for material reserved for recuts.
Label the approved sample with its fabric lot, style code, fold direction and revision date. Give the production and cutting teams the same measurement instructions. Ask how the finished fabric will be supplied as rolls, packages or separate panels. Mark the grain and the top and bottom edges if the printed design makes them easy to confuse. Put the panel code and the quantity on the package so that the cutting team can identify the material before opening it.
For projects that also use a raised surface motif, see the fabric embossing guide. To discuss a pleating sample, contact Ünlü Group with the fabric details, scale drawing, intended fold direction and finished dimensions.
The cover illustrates the fold shapes.
phone: +90 212 576 5250
fax: +90 212 493 0336
email: info@unlutransfer.com
Yenidoğan Mah. Eser Sok. No: 6-8
Bayrampaşa, 34030,
Istanbul / Turkey
TR 9150171175
Bayrampaşa Tax Office