For quick contact: +90 532 288 2200


Map where the foil is missing or raised. Compare the same area after carrier removal, after holding and, when relevant, after care.
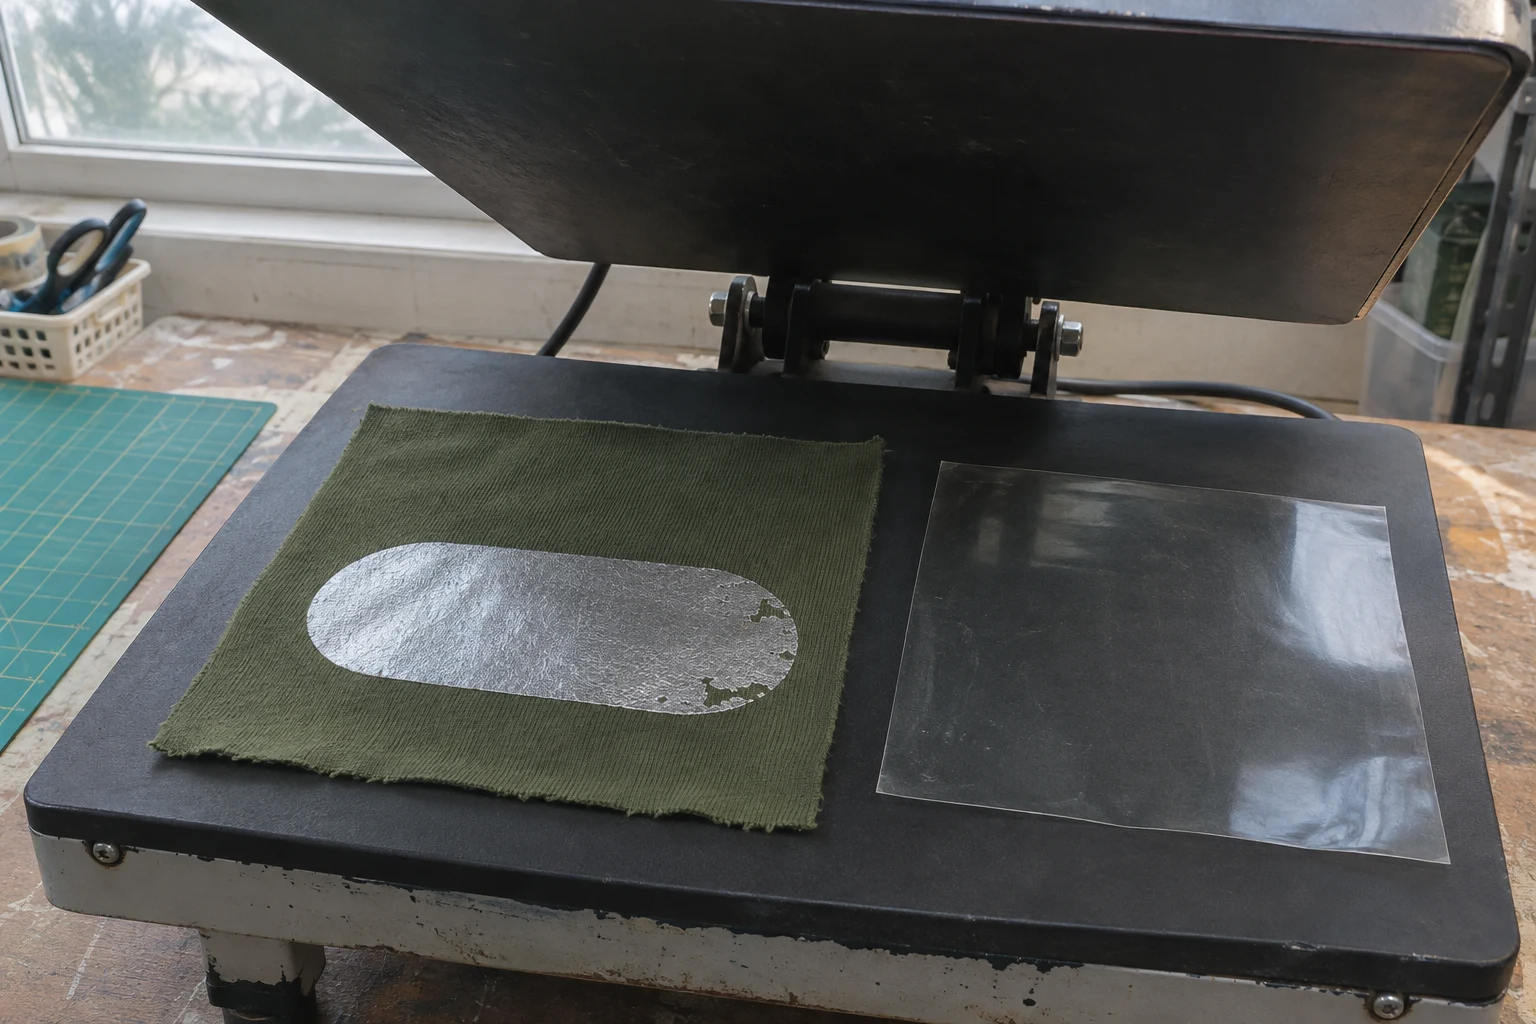
When foil appears missing or raised in patches on plain fabric, record where it happened and when it first became visible. A bare patch immediately after carrier removal calls for a different trial from a lifted edge that appeared after storage, handling or care. Check whether the patch follows the edge of the design, lies inside a flat printed area or appears beside a seam or fold. Photograph the position and make another sample that lets you compare the same point. Appearance can guide the next trial. Confirm the suspected cause against a comparable sample before changing the production setup.
Imagine a solid silver shape transferred to olive fabric. On one sample, a small island of green shows near an edge as soon as the carrier is removed. Another sample looks fully covered when it comes off the press and later shows a raised section near the corner. In the first case, check whether the foil transferred to that area in the first place. In the second, verify that the area was covered initially and look for the step at which the appearance changed. A retained second piece made from the same materials and process gives you a useful comparison.
Photograph the whole sample with the direction of the fabric, the outline of the foil and the nearest seam or join in view. Then photograph the patch. Identify it precisely on the full view. A note such as “olive fabric visible inside the rounded right end, on the seam side” gives the next person a point to find. Separate patches at the print boundary from patches just inside the boundary or in the centre. Note whether missing areas follow a line or are scattered across the shape. Keep this first map with the second trial to see whether the same arrangement recurs.
Check whether the artwork intentionally leaves some areas open. A distressed effect can have deliberate gaps that belong in the design. Mark those in the drawing and identify any other patches that appeared in the applied area. Record the state of the sample when photographed, including whether the carrier had been removed in the intended manner. Look at both samples from the same side and angle. A picture from before removal helps show the placement, while the first inspection of the applied foil shows the appearance of the transferred layer itself.
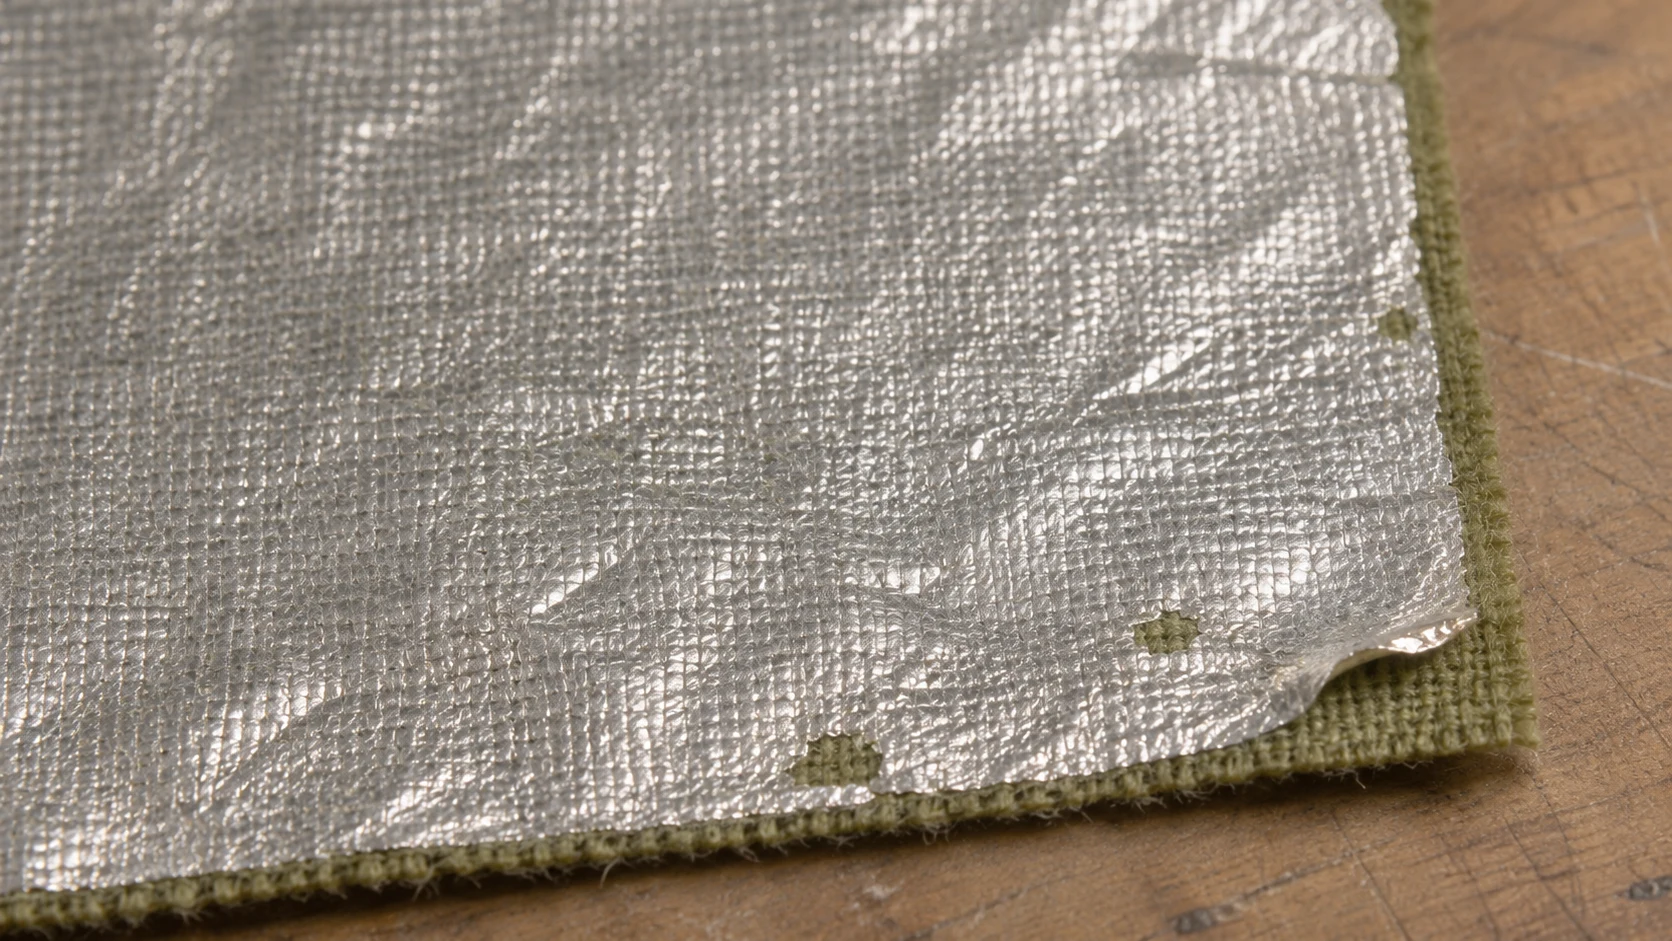
Check whether you are seeing bare fabric, a dull patch in the metal or a lifted edge. Tilt the piece slightly and see whether a dark-looking area recovers the foil reflection. Where olive yarns are visible, compare the surface with surrounding foil and trace the boundary. If the edge has lifted, record it without pulling at it. One opening can grow from the edge. Another can stay in the same place in the centre. A close-up under similar light, together with the sample if it can be retained, shows which change the team should look for on the next inspection.
When the process allows, check the shape of the adhesive before the foil is applied. A cut adhesive can lose a thin section while the excess is removed. A printed adhesive can show an irregular edge or an interruption in the same direction as the opening on the foil. Clear adhesive can be difficult to read on some surfaces, so note what you could see and use the process team's check where available. Keep the point marked on the plan. This makes it possible to compare the prepared shape and the part that remained covered after transfer.
Identify the foil, adhesive and fabric lots and the carrier involved. Compare the application and removal sequence with the instructions for that material. Timing, heat, pressure and removal can differ between systems. Make a repeat with the same material and placement before interpreting a change. If one of the carriers was removed at a different stage, write that down. Keep the spent carrier with the corresponding sample if it helps the inspection and make its orientation clear. A trace left on the carrier is one piece of evidence. Review it alongside the adhesive shape and the transferred panel.
If bare patches appear repeatedly in a row, note how the fabric sat on the press. The opening could stay at the same end of the motif or follow the same location on the working surface after the panel is repositioned. A paired trial with identical materials and a clearly recorded position can help the production team check that distinction. If a flat control was also made at the original location, bring it to the bench. Locate the actual support and any folds beneath the affected point. Write down orientation and placement before another person runs the comparison.
Check whether your test seam represents the one in the garment. The way an allowance is turned can place it under the rounded end of the shape even when the seam itself is farther away. Mark both the visible line and the layers beneath it on the sample record. If the garment has a similar seam in a second position, check which construction was involved before choosing that position as a duplicate. A repeat on another seam is useful when the underlying layers and the distance to the foil are comparable.
Prepare a flat single-layer control and a second sample with the actual seam or layered construction. Use the same olive fabric and the same solid silver shape. On the constructed piece, reproduce the distance to the seam and the way the allowance sits. Use the intended application conditions on both samples and record the direction of the cloth. If the flat piece is fully covered and small patches appear beside the seam, concentrate the next trial there. This observation tells you where to inspect the contact and support. It does not establish a setting for the press.
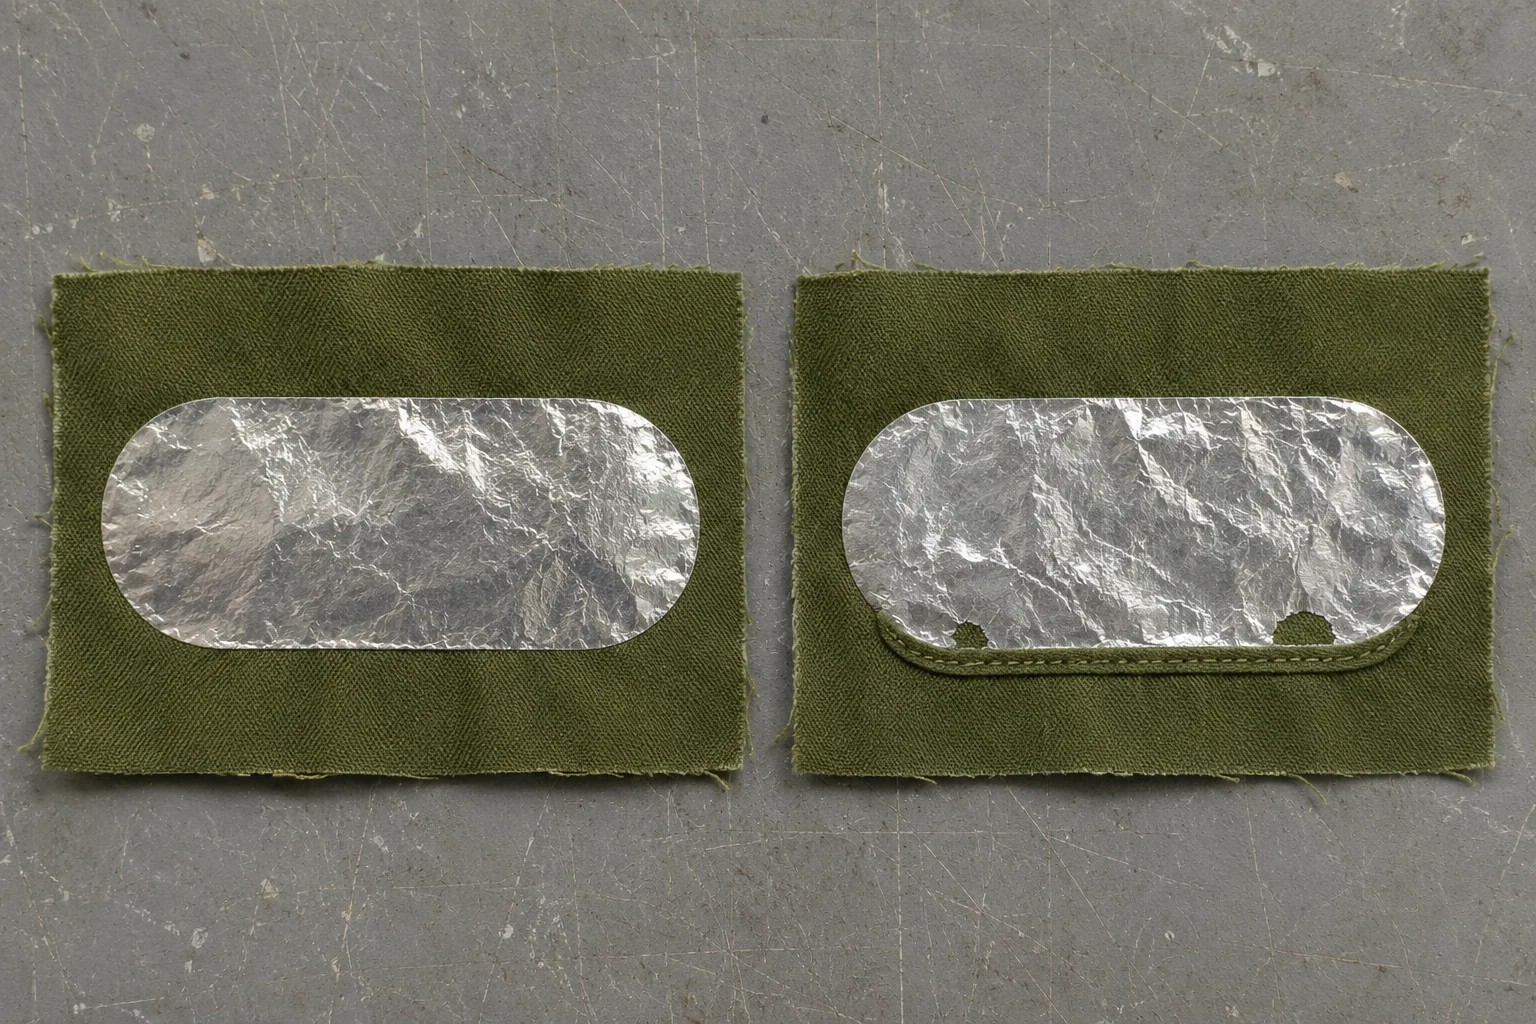
Photograph the front and back of the constructed piece. An allowance can turn under the foil area even when the visible seam appears to sit outside it. A lining can add another layer that is invisible from the front. Confirm whether the pattern allows the foil to move away from that area. If it does, test the new distance using the same materials and application. If the placement must stay, ask the production team to try the suitable support for that system. Change one part of the setup in each comparison so the result can be associated with the step that changed.
Inspect the fabric surface as well. Take a second piece from the same lot before changing to another material. An uneven thread or a change in the texture near the foil can be marked on the sample map. Compare it with where the green shows through. If patches recur on flat cloth in several positions, the seam comparison gives only part of the answer. Return to the adhesive shape, placement and carrier removal before making a further sample. Record when the first result is the same on both pieces and when it appears only on the more complicated construction.
Keep one piece in its initial state and put a comparable piece through the handling, finishing or care step applicable to the order. Photograph both before the step. If one starts with a small opening, mark its outline at the beginning. At the second inspection, record whether that opening has grown, a new patch has appeared or the surface has changed sheen. A pre-existing bare edge can look like fresh damage if there is no earlier picture. With both starting views in the record, you can identify the change rather than just choosing the better-looking sample at the end.
If washing and drying are part of the agreed evaluation, follow the method specified for the product and record both steps. Note when the first inspection occurred, how long the piece was held and when it was checked again. Compare a flat view and the usual shape of the fabric where either is relevant. A fold can make a dull area appear to shift. Bare cloth and a change in lustre call for different observations. Keep the comparison linked to the method used. A result after one care procedure does not establish what will happen after another.
If the first difference appears after folding or assembly, determine which surface touched the foil and where the piece was handled. Hold one sample flat and reproduce the relevant fold or handling on another. Keep the rest of the trial the same. If the patch is visible after this step and before washing, start the investigation there. Record the side of the garment, the fold and the original shape of the foil. When no starting photo exists, retain a comparable piece from the same production and establish its initial appearance before it goes through the step you want to study.
If the follow-up sample looks even, repeat it at the intended size and location before relying on the smaller trial for the entire design. A small silver patch may fit on the flat part of a panel, while an elongated one reaches the seam allowance. Check the part that extends into that area. Keep both samples and mark where the extension starts. This lets you record which part of the foil was checked on a flat surface and which part was inspected on the garment construction.
Give the production team the fabric and foil identifiers, the adhesive method, the application sequence, the first inspection time and the patch map. Ask a question the next sample can answer. Does the same spot appear on a flat single-layer piece? Does it remain in the same location on the cloth when the motif is moved farther from the seam? How does the first appearance of the defect relate to a step in finishing? A focused comparison makes it easier to decide whether to revisit the prepared shape, the contact on the press or a later stage.
On the follow-up sample, photograph the same point even when the defect is gone. Mention any new dullness or crease. If the physical samples will be stored, keep their identifying marks outside the foil and protect the lifted area from further handling. Retain the original patch, the flat control and the accepted sample with their dates. When the fabric lot or seam layout changes, return to the location that mattered in the first comparison. Keeping the old and new positions visible helps another shift confirm whether a repeat has actually solved the problem.
When planning foil printing on fabric, share the full view of the panel and a close view of the patch. Add the fabric and foil used, where the patch sits in relation to the seam, and what happened between the first and later checks. If the first application looked complete, include the evidence for that initial result. The printer can then build a sample around the stage and location that need to be checked and keep the relevant comparison available for the next order.
phone: +90 212 576 5250
fax: +90 212 493 0336
email: info@unlutransfer.com
Yenidoğan Mah. Eser Sok. No: 6-8
Bayrampaşa, 34030,
Istanbul / Turkey
TR 9150171175
Bayrampaşa Tax Office