For quick contact: +90 532 288 2200


Read the colour mark and loose flakes on the contact cloth separately, then check the printed surface for local change.
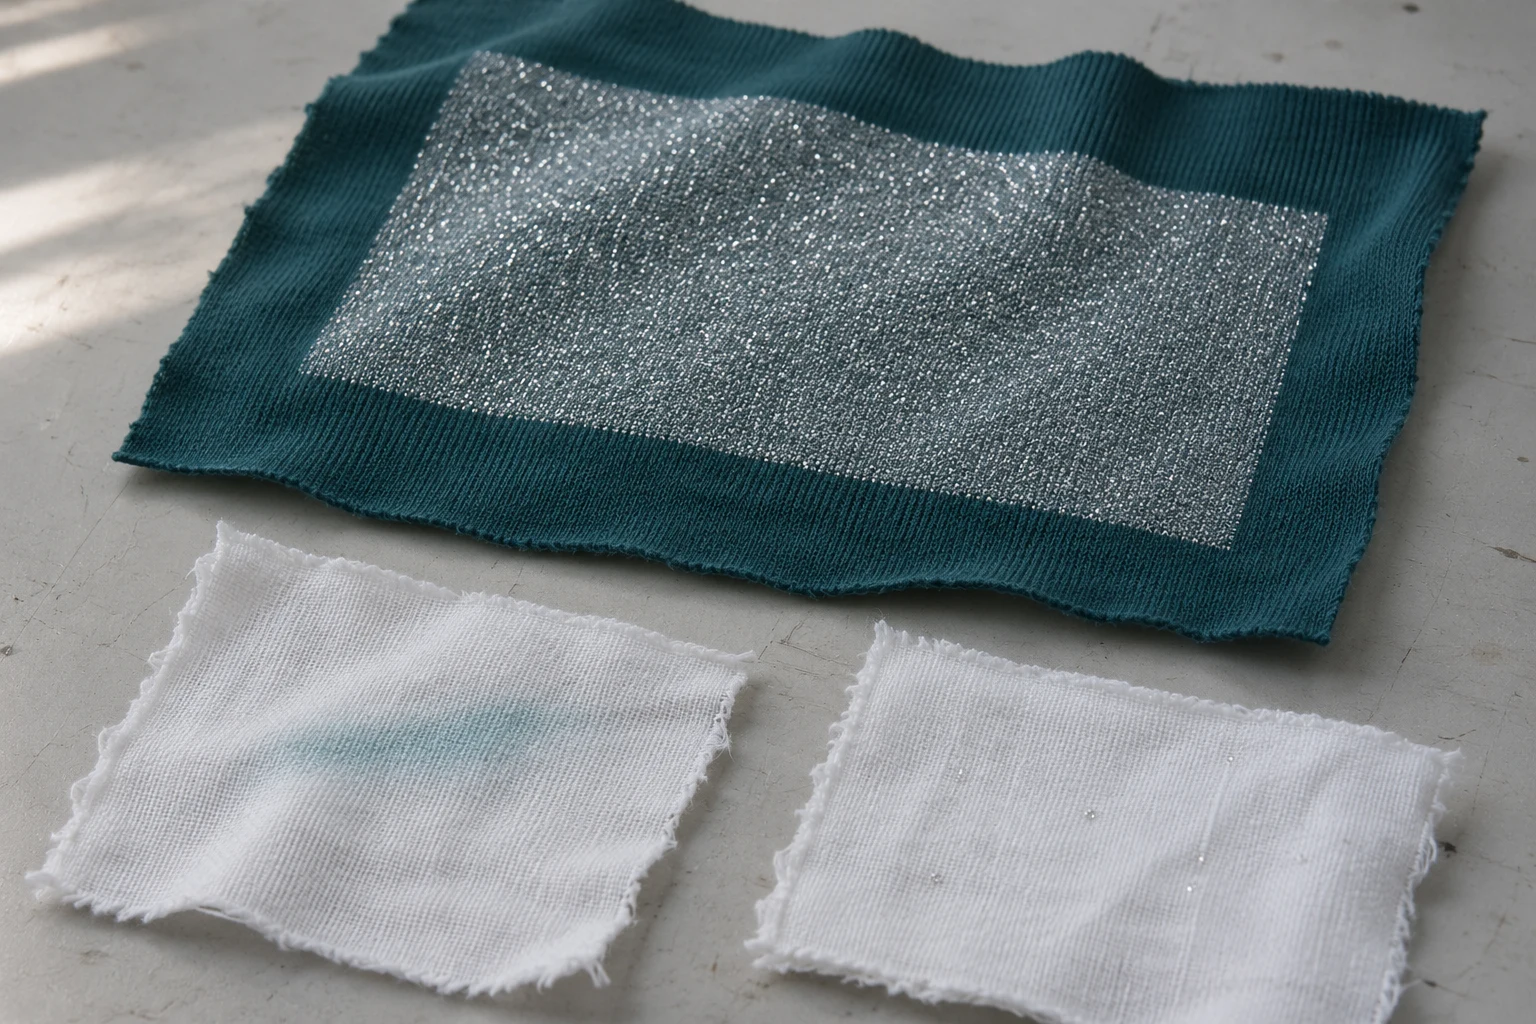
Colour that transfers from a glitter-printed fabric can show up as a diffuse mark on a white contact cloth. Released glitter can appear as individual specks that catch the light as the cloth is tilted. Inspect the printed surface as well, looking for a patch with fewer flakes or fabric showing through where it was previously covered. Record the three observations separately because more than one can occur in the same sample. An unprinted cutting from the same fabric, touched with a fresh cloth, helps you see whether the base fabric can leave a colour mark. If a customer needs formal results, agree separately on what to assess for colour transfer and particle retention.
Imagine a silver rectangle on petrol blue jersey. One white cloth shows a faint blue-green streak. Another has a few scattered silver points. The streak suggests material from the fabric or a print layer may have transferred. The points can be inspected as potential loose flakes. Turn back to the print and look at the contact area in the same light as before. You may see a place where the silver looks less dense, or the two cloths may show marks while the printed area looks much as it did before. A record of both sides of the contact helps the team decide what to check on the next sample.
Start under even light and place an unused cloth of the same type beside the one that was in contact. A colour mark may look like a soft area or a streak across several threads. Tilt the entire cloth to see whether any small points reflect individually. A white fibre at the edge of the fabric or a bit of dust can catch the light too. Use a magnifier if the points are hard to distinguish. Follow the edge of the colour mark first and then look at the shape of each speck. If you can only see a flash and cannot identify a particle, record it as a reflective point for further review.
Both kinds of evidence can appear together. A pale blue patch may contain a few bright points. Write down where the patch lies and how far it extends, then describe the visible points and their locations. Keep cloths apart so loose material is less likely to move from one to another. Photograph the first appearance before handling the area closely. Hold a cloth by its edge if it needs to be repositioned, and record which face contacted the print. A change between the first and later photos can otherwise reflect the handling of the sample during inspection.

The hue of the mark is a clue. If it resembles the petrol shade of the jersey, compare it with a cloth used on unprinted fabric. A coloured underprint or tinted print base may also contribute if the decoration uses either. Where the print team has a sample showing only the underlayer, include it as an additional control. Give each surface its own clean cloth and look at the cloths under the same light. The resemblance between two marks helps define what to check next. A visual match alone may leave the source uncertain, especially if the fabric and the underprint have similar shades.
Use an unprinted piece from the same fabric roll or batch when available. Keep track of which part of the print came into contact. A small motif can be too narrow to inspect on its own with the chosen contact area. A cloth that moves across the edge of the silver rectangle spans the decoration and the blue-green base. Mark that path on a drawing of the motif. If a larger sample is needed to inspect a print layer separately, prepare one with the same system and retain the actual small motif as well. Each serves a distinct purpose because the larger patch does not reproduce the shape or edges of the product artwork.
Start with a clean surface and use a fresh white cloth for each area or condition. Keep cloths from the printed and unprinted fabric apart. For comparison, place the samples with the same orientation and record where contact took place. If you observe dry and damp contact in the workshop, give each its own cloth and note the conditions separately. Combining them on one cloth can make it hard to tell when a mark appeared. Ask the laboratory to choose an appropriate method for formal testing and tell them the dimensions of the actual motif. The workshop comparison helps identify the observation that the test needs to address.
If the unprinted fabric also leaves a pale mark, base fabric colour is a possible contributor. The print may still show other evidence, such as separate silver particles or a different colour mark. If the unprinted sample shows no visible mark, that observation applies to the selected conditions. It narrows the things to check without identifying every speck on the printed sample. Compare the unused cloth, the unprinted control cloth and the print contact cloth side by side. For several colours in a collection, prepare the matching unprinted cloth for each colourway. Record any differences in print base or underlayer rather than reading one result across the whole range.
If you repeat the comparison, use a fresh cloth and an equivalent area unless repeat contact on the same spot is the question. An initial contact and a series of contacts can yield different observations. Indicate the sequence so a loose particle found on the first cloth can be distinguished from changes that appear later. A few visible particles are a finding. Whether they matter depends on the intended use and agreed requirements. Keep the early and later cloths identified and keep the sample available for another look. Saving a clear observation leaves room for a technical review if the parties have different interpretations of what they see.
Locate the contact zone before the first observation. Include a fabric edge or the outline of the print in a photograph so you can find the same spot again. Take the later view from the same position and under the same light. When you move a reflective print, a patch can look less bright even if the particles are still there. Restore the angle, then look for a persistent difference. Does the fabric show through more clearly? Is there an area with fewer visible flakes? Is the change close to the edge? Note the location and visible character in addition to what appeared on the cloth.

Compare the contact spot with an untouched area or with a matching cutting kept before contact. Particles may have been unevenly distributed when the print was first applied. Two unrelated pieces can differ before any handling has occurred. If you have images from before and after, check whether the patch appeared only after the contact and whether it remains visible in more than one angle. Keep a separate untouched sample available for verification. Wiping or scraping the first spot to look more closely could change what is visible. Record the observation in place and use an additional sample for another check.
A pale mark on the cloth with little visible change on the print can lead to a review of colour transfer. A reflective speck on the cloth and a local reduction in sparkle on the print give the team two observations to compare when examining retention. A matte area with a clean cloth may merit a review of viewing angle, original distribution and surface shape. These combinations illustrate how to decide what to check. When the observations are uncertain, write down what could be seen and what could not be confirmed. A description such as “no visible change at the marked spot under even light” gives the team a repeatable condition.
A glitter print on a bag can rub against light clothing. A printed panel can come into contact with its own lining during wear, folding or packing. White contact cloths help compare samples under a shared setup. A separate proof with the fabric that the motif will touch can help show what is visible in actual use. Keep the observations of the two surfaces identified. Several silver specks may stand out on one lining, while a pale colour mark catches the eye on a different material. Describe the situation the sample needs to represent before deciding whether one of the observations should lead to additional testing.
Note when the sample was assessed. A new print, a finished garment and a product reviewed after care are in different states. If a review after care is required, agree on the care condition and keep a comparable sample from before it. Record dry and damp observations independently where both matter. If a blue mark appears only after a particular care step, keep the relevant cloth with the sample information. If a similar number of visible specks is noted in both states, record the condition and contact area for each observation. In that way the next reviewer can repeat the comparison without guessing which sample came first.
A formal rubbing colourfastness evaluation measures colour transfer under specified conditions. Its colour grade does not give a count of released flakes or quantify wear at a particular spot on the printing. If particle loss is a separate requirement, agree with the buyer and the laboratory how it will be assessed. Clarify which condition and part of the motif they need, what observation should be collected and how they will judge the result. Include an unprinted swatch and a view of the motif so the team can recognise the contact area. Keep laboratory results and workshop notes associated with the samples they describe.
Give the sample record three entries for the colour mark, the individual specks and the printed surface. Include the location, contact condition and control beside each one. For example, you might note a faint blue mark on the white cloth, a few discrete silver specks under angled light and a less reflective patch at the centre of the print. State what was visible rather than inferring a cause from the words alone. When the reviewers return to the sample, the sample code and a photo can help locate the same area. The physical cloth and the print give them a way to inspect the finding under equivalent light.
Keep each cloth separate from the printed fabric after examination. If the materials stay in contact, fresh colour or loose particles can move before the next review. Identify them at an edge or on their containers. Send the observations alongside the fabric code, print layout, processing stage and date when asking the print team for a follow-up. For a comparison of finishes, the guide to glitter and foil printing on fabric describes the two effects. For a glitter sample already in review, the useful record shows what reached the contact cloth, what changed on the print and which of the findings still needs to be confirmed.
phone: +90 212 576 5250
fax: +90 212 493 0336
email: info@unlutransfer.com
Yenidoğan Mah. Eser Sok. No: 6-8
Bayrampaşa, 34030,
Istanbul / Turkey
TR 9150171175
Bayrampaşa Tax Office