For quick contact: +90 532 288 2200


Draw the open panel’s inner and outer arcs. Check the finished waist, the spacing at both ends of the pleats and the hem on the sample.
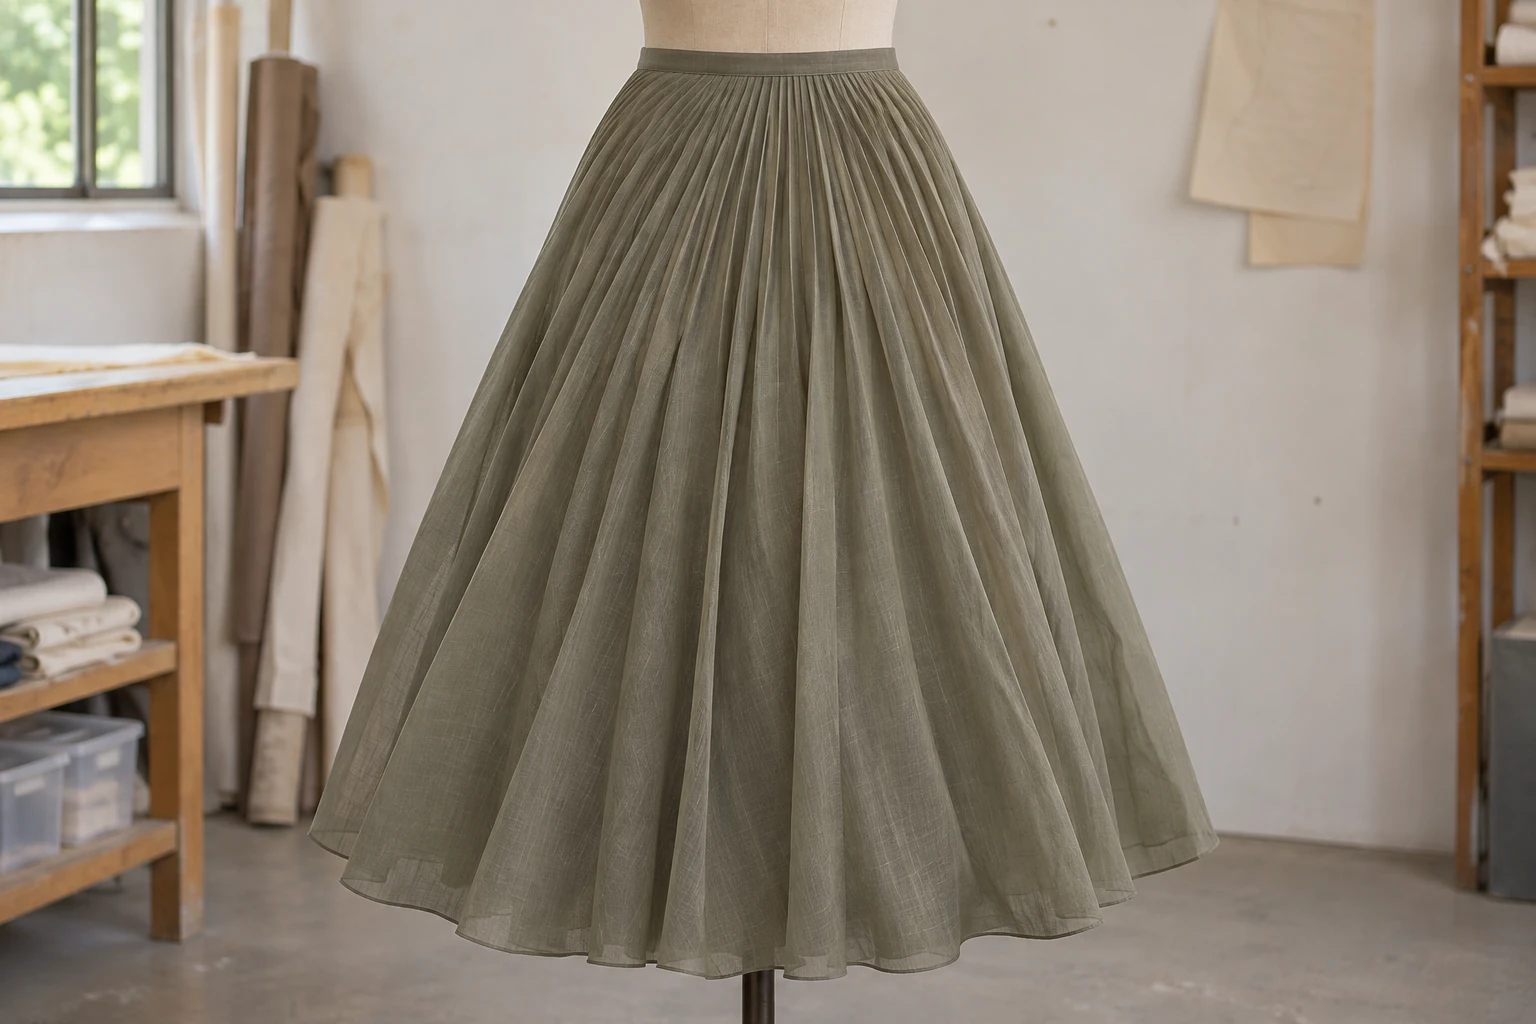
Start with two arcs on the skirt panel. The smaller inner arc marks the waist side. The larger outer arc marks the hem. Sunray pleats spread radially between them, so the spacing near the waist and the spacing near the hem need their own references. Mark both arcs on a drawing of the open panel. Then check the finished waist and the way the folds hang on a fabric sample supported at the intended waistline. Show the sample room where to measure the same set of pleats at the top and bottom. One drawing can then serve both the cutting discussion and the fitting.
Picture an olive-grey midi skirt with a simple waistband and pleats that become more pronounced towards the hem. The waist size and length describe the finished garment, while the pleater also needs to know the panel shape, where the seams land and the expected spacing of the folds. The sample room can then compare the drawing with the available pleating moulds and tell you which edges to prepare before the panel goes into the mould. Use the paper layout to test the geometry, then make a panel in the intended cloth to see how the pleats fall and where the finished hem sits.
First locate the finished waist seam line. Specify how you will check the waist circumference with the waistband joined and the closure in its intended position. State the finished length from the same seam line to the hem. Then prepare an open panel drawing with its inner and outer arcs. The open cloth includes the width that will sit inside the folds, so its inner arc length and the finished waist measurement mean different things. Put the open measurement on the drawing used before cutting and the finished measurement on the garment specification. Use the same names in the notes you send to the cutter and the pleater.
Show the beginning and end of the inner arc, the centre line and the two panel edges. Indicate the distance between the raw edge and the waist seam line. Mark where a zip or other closure will sit. When the sample room needs a short plain section or a specific fold at the closure, show its location on the arc. For two joined panels, you can also state how much of the finished waist each panel should contribute. A front and a back at the same finished length can still need different edge details around a seam or closure.
The pattern may use one or more half-circle or quarter-circle pieces, or another sector the pleater can handle. The choice affects how the panels fit the usable cloth width. Before cutting, ask which panel lengths and inner arcs the available mould can accommodate. Some moulds have an unpleated area near their centre. Check that area on the workshop template before finalising the waist arc. When the size or skirt length changes, check whether the resulting panel shape still fits the cloth and the mould. Send the usable fabric width, target length and waist line together so the workshop can assess them against the actual pattern.
Draw two arcs with the same centre on paper and add a few radial fold lines. Two lines with a fixed angle between them enclose a shorter arc near the centre and a longer arc farther away. This explains the widening visible in the open panel drawing. Once the cloth is pleated, some surfaces remain visible and some turn into the folds. Treat the drawing as a guide to the open geometry. Read the finished waist and visible fold size from the folded cloth under the support and viewing conditions you expect to use at the fitting.

Pick a run of matching folds near the waist and follow it down towards the hem. Say whether the measurement is between two adjacent crests or across a longer run. For example, mark five consecutive crests at the inner arc and identify those same five at the outer arc. Measure consistently across the four corresponding intervals. Choose and mark the exact line if the edge is still unfinished. A longer run makes the overall spacing easier to compare when the pleats are fine. Support the panel gently during the check and avoid stretching it to make it sit flatter.
Review the top and bottom together when choosing a pleat count. A finer layout may pack more fold ends into the waist. Wider spacing may produce larger individual folds at the hem. The thickness under the waistband also depends on the cloth and on how much of it turns inside each fold. If the top feels bulky or the bottom rhythm is broader than the brief calls for, ask whether a different count or mould is available and sample it. Save a waist close-up and a hem close-up for every option. Place the comparison photographs at similar scale so both zones are easy to review.
Distinguish count, spacing and depth in the notes. State the number of crests across the panel, the location of the measurement line and which part of the fold the measurement covers. A measurement taken just below the waistband seam may describe the visible skirt better than one on a portion hidden under the waistband. At the bottom, state whether the measurement is on the finished edge or a set distance above it. If the workshop names a crest or valley differently, mark the feature on a photograph. The next person can then repeat the same observation even when they use a different term for the fold.
To compare two paper layouts, retain the same garment brief and sketch a second option with a larger outer arc. Discuss whether the change could come from a different sector angle, panel length or pleating mould. Mark the same group of folds on both options and see where the added width appears. Then confirm the waist and length of the folded samples before comparing their hems. If the added sweep also changes the approved length, make that change visible in the drawing. The paper comparison and the garment fitting can then answer different parts of the same design question.
The radial lines of a sunray panel cross the warp and weft at different angles. Mark the grain, centre front and panel edges on the same cutting drawing. If the cloth changes sheen with viewing direction, check that adjoining panels are cut with the intended orientation and face. When a bias area hangs differently, record where it happens and what position the sample was in. Check that position in the intended cloth, using a piece large enough to hang from the waist. A folded paper template gives the direction of the rays. Fabric samples show the way the material settles under its own weight.
Show where two panels meet in relation to a crest or valley. A join along a valley will read differently from a join running through a visible fold face. Place the finished seam lines together and see where the last fold on one side meets the first fold on the other. Matching the raw edges can still leave the visible crests out of alignment. For an early mock-up, use two sections large enough to show the join down to the hem. Check it in profile as well as on the table. If a step appears at the hem, compare the two lengths beside the seam before changing the whole outer arc.
When sharing two panel shapes, label the cloth face and the cut direction on both pieces. An unmarked panel can be turned over during a quick table check, making the grain or seam look correct from the wrong side. Verify the assembled pair from the face before recording the reference view.
Support the sample at the intended waist seam and give the hem clearance from the floor. Identify the front, back and side seams before looking for changes in the hem level. Look at where the folds widen and whether the edge sits higher or lower in a particular section. First confirm that the waist support is level. Once that is established, describe the change by panel and position. Length taken along a panel from the waist seam to the hem and height above the floor answer different fitting questions. If you use both, record the reference points and keep the support in the same position.

Confirm when the hem should be finished in the workshop process. One workflow may finish the edge before pleating, while another may establish the final length after fitting. The cloth, selected finish and mould influence the choice. A thick temporary strip can weigh down the lower portion and change how it hangs. Test a sample edge that resembles the planned finish before judging the final result. Look for continuity along the lower arc and a smooth meeting point at the seam. Photograph the hem from the same position on each version so differences in shadows do not obscure the shape of the edge.
Keep a front view with the waist supported, a side view of the join and a close view of the free hem. Label the views with the sample version. A photograph with the skirt pulled sideways can show the pleat structure, while a photograph of the resting garment can show how the hem falls. When the decision concerns hem level, compare two views of the resting garment under similar conditions. If the intended design has deliberately different lengths at front and back, note both on their respective panels. Use the waist seam reference from the drawing so the pattern and the photographs can be read together.
Send the finished waist and length, both arcs for each panel, the grain, fold direction and seam positions. Attach the pleat count and the points used for the top and bottom measurements. Record the pleating mould and hem finish associated with the sample. Review the rhythm of the folds at the waist and hem before signing off. If the waist has too many layers, review the fold count and turn beneath the band. If the bottom is too narrow, compare the outer arc, length and finish one at a time. Keep an open-panel view and a view on the form, with the same section marked on both.
Before cutting production panels, compare the current drawing with the approved fabric piece. If the cloth changes, sample the chosen arcs and fold layout in the new material. If the waist or length changes, review both arcs and the mould limits again. Keep local adjustments tied to the point where they were observed. A step next to a side seam may call for a change at that join, while the rest of the hem can remain as drawn. A new sample is easier to assess when the measured position, pattern feature and previous view all refer to the same fold or seam.
phone: +90 212 576 5250
fax: +90 212 493 0336
email: info@unlutransfer.com
Yenidoğan Mah. Eser Sok. No: 6-8
Bayrampaşa, 34030,
Istanbul / Turkey
TR 9150171175
Bayrampaşa Tax Office