For quick contact: +90 532 288 2200


Compare the same textile motif above and below the fabric surface. Check the outline, reverse and appearance on the finished product.
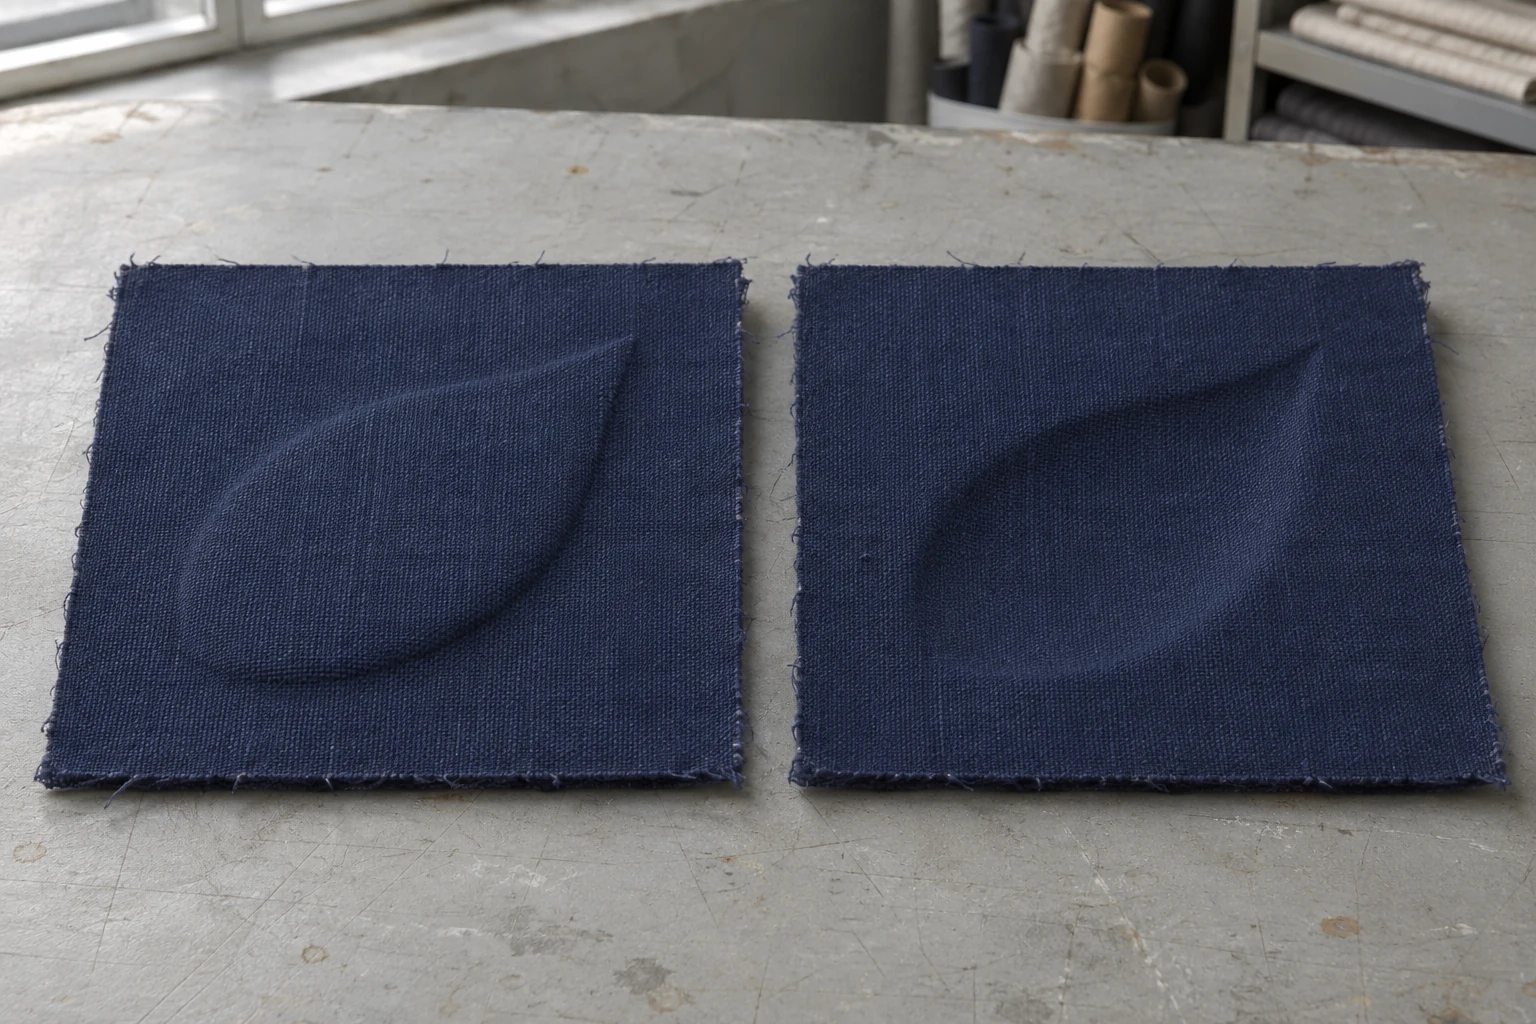
To choose between a raised and a recessed motif, sample the same outline at the same size on the intended face of the same fabric. In the raised version, the shape sits above the surrounding cloth. In the recessed version, its inside surface sits below the ground. Put the samples in the same orientation and check the outline, the tip and the transition into the ground. Compare them in the position and at the distance in which the product will be seen. Look at the reverse as well. The choice depends on how easily you can recognise the shape and what the process leaves on the side that will be visible or in contact with another layer.
Imagine a simple leaf with a tip that leans to one side, formed in navy cloth. The top of the raised leaf may catch the light while one of its shoulders casts a short shadow on the ground. In the recessed sample, one of the slopes into the shape may look dark and the other brighter. The same leaf can draw your eye to a different edge when viewed from another angle. One version may make the tip easier to trace, while the other makes the curve in the wider part more apparent. Look at the physical pieces at the distance where the leaf needs to be recognised as well as in close view.
In Turkish textile work, gofre can describe the roller embossing process. Raised and recessed describe the direction of the relief seen on the finished face.
Specify which face of the cloth will be visible. Describe whether the finished shape rises above that face or sinks into it. A recessed mark is often called a deboss. In textile work, embossing can also describe a range of processes that shape the fabric surface. When requesting a trial, use the term alongside a drawing and a description of the finished face. The supplier can then interpret a raised feature on a tool separately from a raised feature on the product. Mark the other side as the reverse and explain whether there is a requirement for its appearance.
Show the leaf at the same scale in both drawings. Keep the direction of the tip, the long axis, the outline and the fabric direction fixed. In one drawing, mark the leaf area above the ground. In the other, show it below the ground. A narrow line that follows the outline looks different from a solid leaf-shaped area raised or lowered throughout. If one trial has a filled leaf and the other has only an outline, two parts of the design have changed. Compare equivalent shapes first. Then try an outline separately if you want to know how it reads in the same size.
Ask the supplier whether both versions are suitable for the material and process you intend to use. The actual height, depth and edge transitions may differ. Record any difference in shape or dimension that matters to the decision. Keep a piece of the same cloth without the motif so you can check whether sheen or firmness is already present in the base. If the design will be tried on two fabrics, keep a pair of references for each. A result from one fabric does not establish which direction will work better on another.
Before the trial, identify the part of the leaf that determines whether the shape can be recognised. The broad area may be rounded while the tip turns slightly to one side. Follow the same contour on each piece. If one shoulder is noticeably wider, record whether you are seeing that difference in addition to the change in relief direction. If the specification calls for equivalent local heights or depths, use a suitable profile method on both samples. Include the measured fabric profile with the tool specification.
Lay both samples on the same support with their intended faces up, leaf tips pointing the same way and yarn directions aligned. With soft side light, locate the edge facing the light and the opposite edge. Look from the ground into the shape. On the raised piece, look for the change from the ground up to the face of the leaf. On the recessed piece, inspect the slope towards the lower inside surface. A highlight at one angle provides only part of the information about how the fabric is shaped.

If one sample is closer to a window, swap their places without turning them. Check whether the visible difference follows the cloth. Lower your viewpoint slightly and see which part of the leaf remains distinct. Look at the tip, the broad curve and where the edge changes direction. Save a close view and a view from the intended distance. If a numerical height is needed, agree on an appropriate surface profile measurement with the team. Use the photograph to identify the position and show the light rather than to measure depth from the shadow.
Review both pieces in a more diffuse light. A motif that is easy to recognise in side light may be less distinct where the product will be seen. A reviewer might find the broad parts of both leaves but lose the tip of the recessed one. From another angle the result could change. Agree on the detail that matters. For a design that requires the whole outline to be visible, check the entire boundary. If its direction is the important feature, see whether the lean of the tip can be identified under ordinary light.
For a closer comparison, note where the highlights fall and then move the light to the opposite side without changing the fabric or the viewpoint. Look again at the same two edges. The shadow can move enough to make a photograph suggest a different shape. Check the transition against the actual ground on the physical sample. Keep the direction of the light with the photographs so others can repeat the view. On the drawing, state which part of the shape is physically above or below the visible fabric face.
Look at the back of both pieces. The raised shape on the face can leave a subtler impression or a change in texture on the reverse. The materials, support and forming method can affect how much shows through. Photograph both sides and label which is which. You can turn a corner to see the weave on the reverse. A leaf tip may change direction from your viewpoint when you turn the cloth over. Record which edge you turned it over so another reviewer can tell the orientation of the motif from the direction of its relief.

Decide which feature matters on the reverse for the product. The inside of a lined bag may be hidden while an impression can still be felt through the lining. If the product is reversible, any shape on the back will be part of the visible design. Put a piece of the intended lining or backing in place for the trial and use the same arrangement for both options. Note where an impression or firmer area appears. Compare the same spot with an untreated part of the cloth and record the visible change and the feel separately.
A sample can look flat on its own and curve around a folded bag edge or a padded cover. Check both faces flat first, then use a small mock-up of the part that will carry the motif. Look at any area where the cloth turns towards the inside. If you want the tip to point right on the front, note how the reverse was viewed so that the fabric cannot be cut in an unintended direction using that photograph alone. Keep both face views with the approval when the reverse will be seen or touched.
Place both samples, one at a time, on the same part of an equivalent product mock-up. A leaf on a flat flap can be seen from a different angle from one on a curved or flexible panel. A curve may turn one slope towards the light and leave the other in shadow. Keep a picture from the normal use position alongside your clearest close view. Describe which edge is visible first and whether you can make out the full shape.
A detail intended for close inspection may only need to show as a subtle line under side light. A motif meant to be recognised from farther away may need both the tip and the main curve to remain visible. A sample may have good definition on a desk and lose it on the curve of the product. Record what was visible, from where and in what light. If two people notice different features, repeat the comparison from the same viewpoint and ask each to locate the outline before checking the sample codes. Where the product is moved in use, see which views are likely to recur.
If the lining lies loose in the trial, check the appearance again when the layers sit as they will in the final construction. A shape that is difficult to notice underneath a loose lining may be more apparent on contact. If a reviewer can feel a difference, identify its point on the leaf and note whether the piece was flat or placed on a curve. Use the same support for the two variants so the change in support can be distinguished from a difference in the made samples.
If both versions are legible in the product position, return to the reverse-side requirement. The option with a clearer front contour may leave a more noticeable impression under the lining. State which feature takes priority for that part of the product. If each is suitable in a different position, record both decisions with their viewing conditions. A change in fabric or backing calls for a new comparison of the feature that determined the choice.
Include the fabric identifier, artwork size, visible face and selected direction in the approval. State which views were taken under the same conditions and which show the product position. Keep both samples if possible and include a view of the back of the one approved. If the fabric, motif size or position changes, check the feature that supported the choice again. Record which elements will stay fixed in the next trial and which will change.
Use explicit wording in the design file, such as “the leaf face sits above the ground” or “the leaf interior is recessed below the fabric face.” Name the contour detail that must remain visible and the distance at which it will be checked. Include any requirements for the reverse or lining. A record might say “the front tip is recognisable at normal viewing distance and the lining shows no visible line over the motif.” If both variants can be used but on different product parts, give each part the appropriate sample identifier and direction. The production team can then link the intended shape with the piece, face and conditions on which it was approved.
phone: +90 212 576 5250
fax: +90 212 493 0336
email: info@unlutransfer.com
Yenidoğan Mah. Eser Sok. No: 6-8
Bayrampaşa, 34030,
Istanbul / Turkey
TR 9150171175
Bayrampaşa Tax Office