For quick contact: +90 532 288 2200


Make an actual-size test card on the intended fabric. Check line continuity, open fabric between lines and corner definition after transfer.
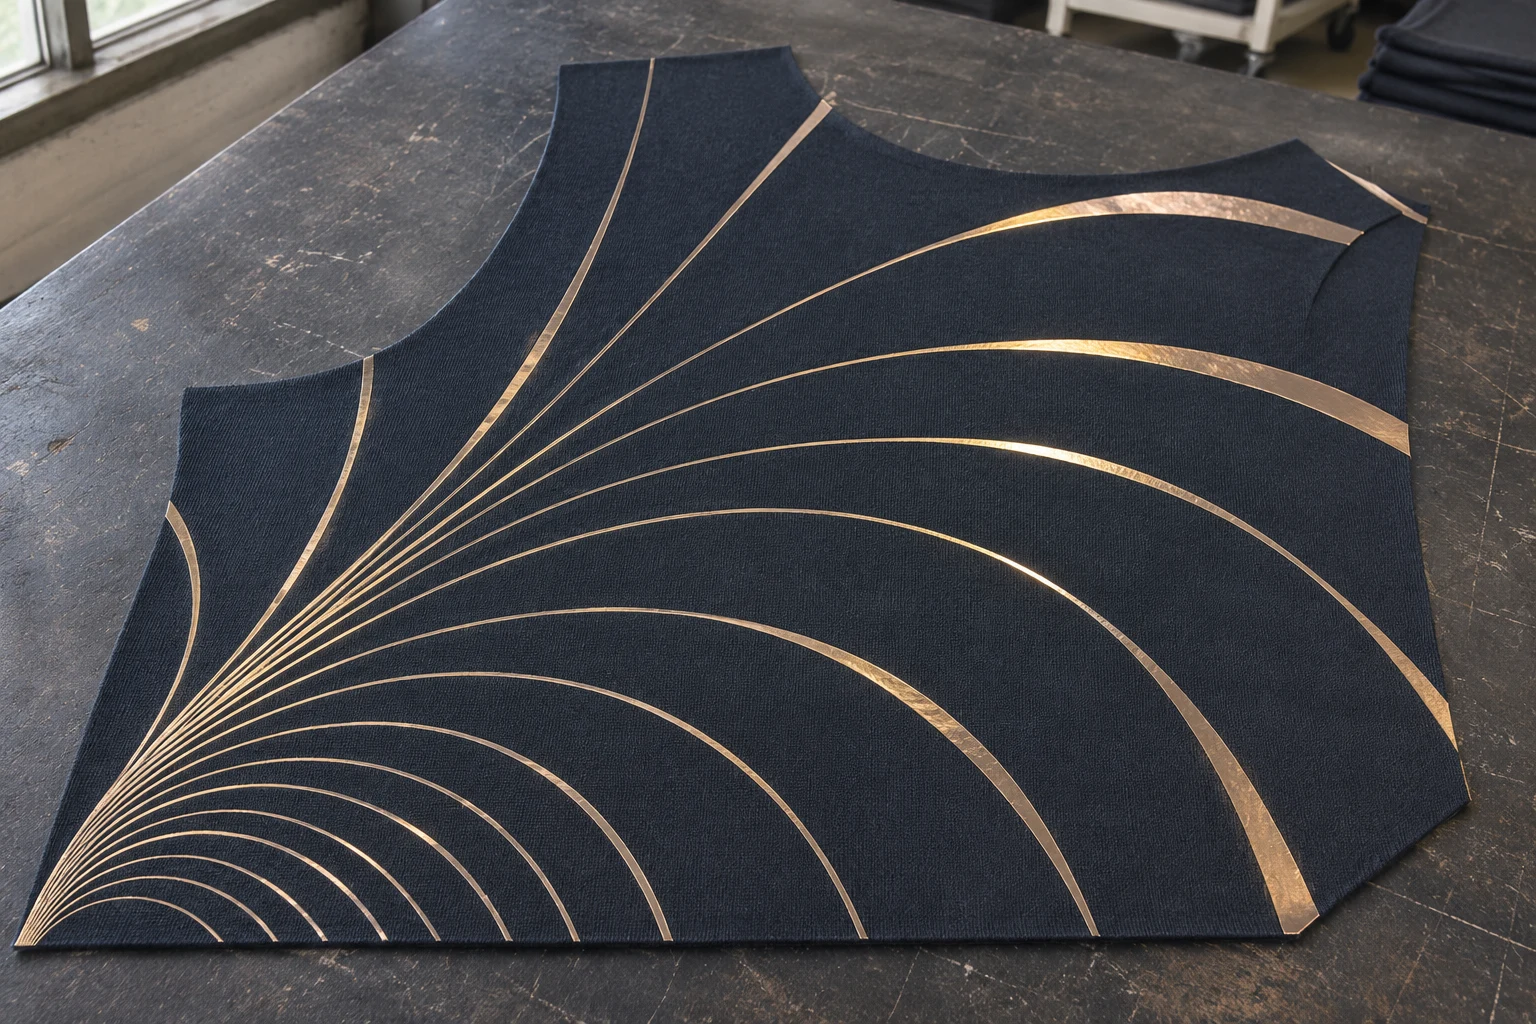
Find the smallest detail that holds by making an actual-size test card on the intended fabric, with the foil and adhesive process planned for production. Place the original detail next to a version with a wider line and another with more space between adjacent lines. Once the carrier has been removed, read the results separately. Check whether the line is continuous, whether you can still see fabric in the gap and whether the corner keeps its intended shape. A break, a bridge of foil and a softened corner can call for different changes. The card lets you work on those details while keeping the wider design in view.
Imagine a fan of fine champagne-gold lines on dark jersey. They are well separated as they open out, then approach one another near a lower turn. At first glance the outer lines shine clearly while the lower area looks busy. A closer look might reveal a missing tip on one line and a small connection between two others. Mark both observations on the test card. Give the first issue a line-width comparison and the second a gap comparison. A wider stroke may solve the break while making the narrow area around it harder to read.
Record the fabric article, its face and direction, the foil and the adhesive method. In one production route, the adhesive is printed in the form of the motif. In another, the adhesive shape is cut and prepared for transfer. Each route has its own way of preparing the detail before the foil is applied. Prepare the test with the method intended for the job. If a presentation sample was made by another method, keep that fact with the sample. It can still show the position and appearance being discussed, while the production trial establishes how the intended process handles the geometry.
Mark the parts of the artwork that must survive. On a fan design, the outer curve, the exposed jersey between two lines and the pointed end of a turn might all matter. Find where the line is at its thinnest and where the neighbouring lines come closest. Keep the narrow ends and their adjacent features in the same test. A single stroke on open fabric can look fine while the same stroke in a dense part of the artwork is difficult to distinguish. If a corner will appear prominently near a seam, note that location before building the card.
If the motif is used at several sizes, cut a proof section at each relevant scale. A large version on the front of a garment may give the foil strokes plenty of space. The same drawing, scaled down for a sleeve or pocket, may close the gap at the tightest turn. Include the actual detail at both sizes and orient the area as it will sit on the garment. If the smaller version will also be placed on a different fabric direction, test that direction and record it. A comparison with a tilted swatch on the table cannot substitute for the way the final panel is cut.
Prepare a group of straight and curved lines in several widths, with the intended width alongside a slightly larger one. In another group, keep the two metallic stroke widths the same and increase only the fabric gap between them. Use a third group for details such as a tight inside turn, a sharper outside tip and a rounded alternative. Select the corner shapes that actually occur in the artwork. If the line tapers, include part of the taper and mark where the fine end should stop. That is often a more informative test than a long rectangle of the same average width.

Keep a small solid area of the same foil on the card. Use it to see the general appearance and coverage during that run. If the solid area looks even and a fine point is missing, start by checking the preparation and transfer of that point. If the solid area also has missing patches, inspect the whole application before choosing a new line width. Record how the card was run so the next trial can reproduce it. The solid patch provides context for the detail test, while a separate finished-product trial can address any care or durability requirements.
Draw a simple map of the test card and record the actual dimensions of the relevant line, gap and turn. Identify each position outside the shapes being assessed. If swatches are cut up after transfer, jot the position on the back or keep a photo with the mapping. Two similar strokes can be hard to tell apart once the cards have been moved. Put a dense section of the real fan on the card too. This ties the row of simple tests to the point in the design where the lines come together. Change one feature in a neighbouring sample to show what the adjustment does to that group.
Consider one further variation if the original tips are tapered. A shorter, slightly wider tip can preserve a line that would otherwise break, while a longer tip spaced farther from its neighbour keeps more of the original outline. Record which choice each version tests. After looking at the narrow section, compare the whole motif. A change that improves one corner may alter the rhythm of the lines when seen from the other side of the garment. Keep the smallest alternative that produces the appearance you want on the actual material.
Where the process allows, inspect the same feature in the adhesive shape before the foil goes on. If the adhesive is cut, check that the fine point and the inside opening are still in place after the excess material has been removed. For a printed adhesive, examine the continuity of the line and the space between two adjacent shapes. A clear adhesive can be difficult to see on a textured surface. Use a suitable check for the method in use and keep the position of the feature recorded. You can return to that point after transfer instead of guessing which corner was examined.
Use the application and carrier-removal conditions specified for the particular materials. Run the geometric variants through the same sequence so differences in the card can be considered against the same process. If a separate trial changes an application step, keep the original design version available and record which operation changed. Changing the shape and how it is applied in a single step makes the improvement harder to interpret. Place a duplicate of an important line in another part of the card if you want to see whether the difference repeats.

After removing the carrier, locate the point that was missing, uneven or joined to its neighbour. If a tip was already absent from the prepared adhesive detail, return to that step. If it was present and disappears after application, prepare a comparison that focuses on the transfer and carrier removal. If a strand of foil bridges a gap, look at the gap in the artwork and in the prepared adhesive before deciding what to change. The path from the original shape to the finished sample gives the team a specific place to look for the cause.
Read inside and outside corners separately. A filled inside turn can look rounded. A missing outer tip can make the foil appear to stop before the intended corner. Mark both on the sample map. If the outside silhouette is important, compare the variants that keep the turn visible. If the dark sliver around it needs to remain clearly open, look at that space too. Check more than one turn before you choose a version. The sharpest angle on the sample may behave differently in a more crowded part of the design.
Inspect the cards flat under the same light, then tilt them together. At one angle, a strong reflection from neighbouring lines can make the space between them seem narrower. Look closely from another direction to see whether exposed fabric remains. If a strip of foil stays in the gap as the sample moves, mark that position. If the dark fabric is present and the impression changes as the reflection moves, record the angle or bend that brings the lines together visually. Try the wider-gap version in that same position if the two lines need to stay distinct during normal use.
View the selected sample from the usual distance before reaching for a magnifier. A small rough edge can be difficult to see on the whole design, while several merged lines can make an entire corner look heavy. Use magnification to find the exact feature that changed your decision. If the team needs a photo, put the first version and the adjusted one in the same frame under the same light. Identify the actual area to examine. Compare the physical samples for gaps that are hard to judge in the reflection produced by the camera.
Hold the material on the panel where the motif will sit. Near a finished edge, one tip can fall into the seam allowance or disappear briefly around a fold. Look at the overlap with the neighbouring part and check the fabric direction. If a line is meant to remain visible at the hem or pocket, inspect it on a sample assembled or folded as intended. A test card can confirm which dimensions transferred successfully. The full panel shows whether those dimensions preserve the effect at the finished edge.
If the same motif will go on a second fabric, keep the accepted card from the first fabric while you prepare the new one. Repeat the chosen dimensions and the closest alternatives in the areas that matter. Check the narrow opening and the tip at the same angle before looking at the complete motif. If the second fabric needs a change, label the version for that fabric. This keeps the earlier approval available when the first combination is ordered again.
Keep the fabric and foil references, the adhesive system, the artwork version and the dimensions used in the card. Mark the accepted line, gap and corner and note which features did not carry through in an earlier version. Include where the detail sits on the garment and how it was viewed. For a significant inside or outside corner, keep a close-up plus a view of the full panel. A new reader can then see both the reason for a change and how it affects the broader design.
Retain a copy of the proof with the map. Recheck the relevant details if the fabric, artwork size or placement changes. When discussing foil printing on fabric, provide an actual-size version of the motif, the fabric face, the foil colour and the smallest detail that matters. Point out the dark fabric that should remain visible between the strokes. With the dimensions and the accepted physical result linked, the printer can reproduce the comparison and the designer can see which version was approved for the job.
phone: +90 212 576 5250
fax: +90 212 493 0336
email: info@unlutransfer.com
Yenidoğan Mah. Eser Sok. No: 6-8
Bayrampaşa, 34030,
Istanbul / Turkey
TR 9150171175
Bayrampaşa Tax Office