For quick contact: +90 532 288 2200


Compare the weave, weight, previous finish and drape on paired swatches to see how the same roller-embossed motif reads on each fabric.
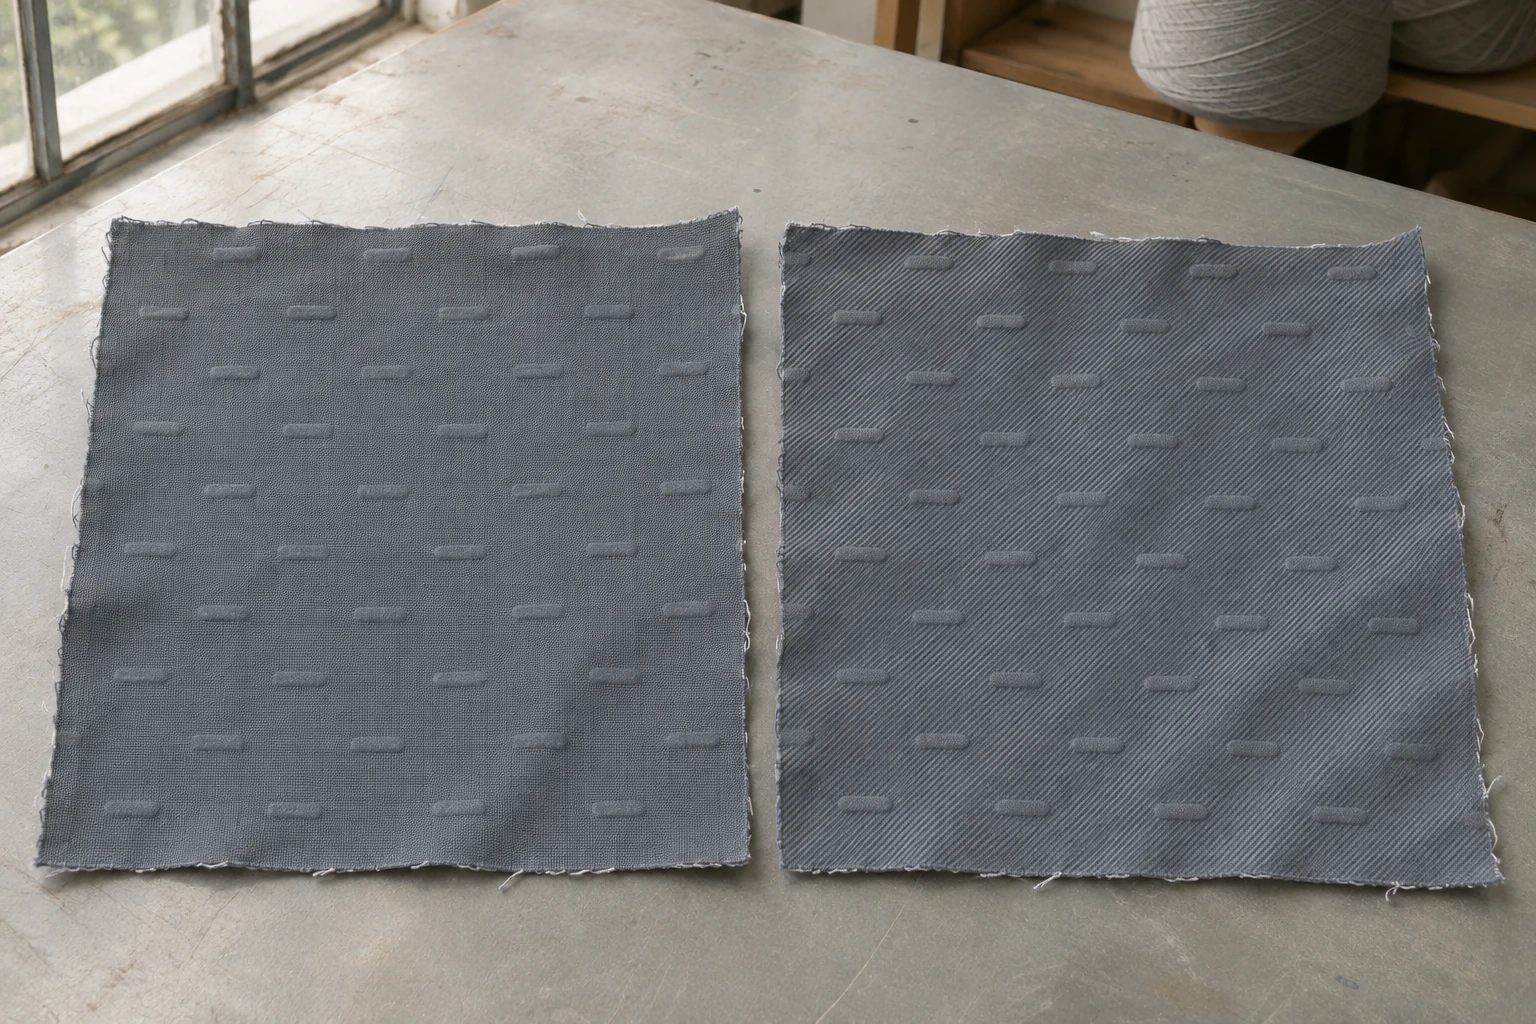
Fabrics with the same fibre content can show the same embossed design differently. The way the yarns interlace, the smoothness of the surface, the response to pressure and any prior finishes can affect the relief or how clearly you see it. Keep a piece of each fabric as received and, where both materials can use the same process conditions, try the same motif on each. Compare the outline of the motif, the sheen of the ground and the feel of the cloth before and after embossing. Then see how the two samples look when allowed to drape as they would in the finished product.
Imagine a blue-grey cotton plain weave and a cotton twill of a similar shade. A repeated design made of short dashes may be easy to see on the plain background. The diagonal texture of the twill may make parts of the dash harder to distinguish from one angle. A different pair of swatches could behave differently. On a curved surface the highlights move, and the fabric that stood out on the bench may read differently on a garment. The comparison helps you choose a specific design and fabric for the way the product will be seen.
Ask for the weave, available yarn details, weight per unit area and finish history as well as the fibre percentages. In plain weave the weft passes alternately over and under the warp. In a twill the binding points shift to create a diagonal line. Some twills show a strong ridge in light while others present a much finer background texture. Yarn thickness and surface hairiness can also vary. A description such as “cotton twill” identifies a construction and fibre family. Compare the actual swatch to see how pronounced its diagonals are and which features might remain visible next to the emboss.
Keep an unembossed piece of each candidate. Identify the intended face and note the yarn direction and any sheen difference between the two sides. Compare the fabrics in soft side light and in more diffuse light. In close view, find the diagonal of the twill and the small intersections of the plain weave. If you see a shiny line on one of the unworked faces, record its location. When you see a line after embossing, you can check whether it was already there. Put the sample identifiers on the back or at an edge so the face and direction remain clear after cutting.

Choose the face that will be visible in the product. A fabric can have a different mix of exposed warp and weft on each side, or look different after finishing. Keep the fabric direction fixed as you photograph it. If you need to compare both sides, make a separate record for each. Similar colours help you compare two constructions. Where the shades differ, record that difference before processing. A pale ground and a dark ground can show highlights and shadows differently even when the relief has the same shape. Mark the warp direction using the yarns as a reference. The cut edge may be slightly off grain.
Fabric weight describes mass per unit area. Two fabrics with the same weight can differ in thickness and feel because of the yarns, their spacing or their finishing history. Their response to compression can also differ. A heavier fabric does not always show a more legible embossed design. A lighter cloth with a quieter ground may make a shallow motif easier to see. Record weight alongside the sample details. Use the physical pieces to compare the shape of the relief and how readily each fabric bends.
Previous finishing can affect sheen or handle. If you know that a fabric was calendered or underwent another finishing step, add that to its record. If the history is unknown, leave it open until the supplier can confirm it. Similar sheen on two fabrics can have different origins. Ask when a known finish was applied in relation to dyeing and whether it is the same for the next colour or lot. Keep the supplier's material code and the lot or colour identifier with the observation. If A and B differ in both weave and finish, the comparison speaks to the two complete fabrics. To investigate weave alone, select candidates that match more closely on the other factors and record any differences you cannot control.
Consider what the product needs after care. A patterned roller uses pressure and, depending on the process, heat to shape the textile surface. Heat-responsive fibres and some cellulosic constructions can depend on different finishing routes for retaining their shape. Check the resulting fabric under the care conditions agreed for the product if the effect needs to survive cleaning. Record its first appearance, its appearance after resting and any subsequent care results separately. This helps you judge the approved surface as delivered and again in the condition relevant to its use.
Compare the feel of the unembossed samples before processing. Let pieces of the same size bend naturally, holding them from an equivalent edge, or place them in turn over the same support. If one already bends less easily, make a brief note. After embossing you can compare its change against its own initial condition. A hand comparison can describe a difference in feel. If you have a numerical requirement for bending or thickness, agree on a separate appropriate method and document the conditions used to obtain the reading.
Where a common set of production conditions is suitable for both candidates, use the same patterned roller, direction and process setup for the first trial. Record what was held constant about the run, such as pressure, temperature and passage through the machine. On the review bench, put each embossed swatch next to its untreated equivalent. Then compare the two embossed faces. The first trial shows what happened under that set of shared conditions. If the same conditions are unsuitable for either candidate, run the appropriate trial for each and record how they differ.
Look at the tip, the centre and the space around each dash. One fabric may show the rounded tips clearly while its diagonal texture makes a long edge harder to see. On the other, the long edge may stand out while the ends fade in brighter light. Compare several repetitions at the same distance and angle. Take note of where the twill diagonal meets the embossed dash. An isolated yarn irregularity can change one repeat without being typical of the cloth. After you have recorded both pieces in the same orientation, turn them by the same amount if you want to see how the angle affects the result.
Photograph the two finished swatches in the same frame when practical so any exposure change affects both. If one is closer to the window, switch places without turning them and check whether the observed difference follows the swatch. Photograph the untreated pieces under matching light as well. If the motif stands out only under side light, check it under soft light similar to that of the intended setting. Describe the useful detail, for example “on the plain weave both ends of the dash still show under diffuse light.” If the trial uses two sizes of motif, note the sizes separately. A wider shape can remain visible where small dashes blend into the ground.
A second trial may use settings chosen for each fabric. Keep it together with the first record, with the conditions clearly identified for both. Suppose the production team adjusts the process for one fabric to limit an increase in sheen. Retain the piece and photographs from its first trial, then compare the new piece to its own earlier sample. Review the outline, sheen and handle again. Finally, compare the two candidates under the conditions you would actually use to make the product. The shared first trial and the adjusted second trial answer different questions, so identify which sample supports each decision.
Lay the two processed samples over similar rounded supports with their motifs pointing the same way. Let them fall into shape without pulling them tight. Start by confirming what you saw on the bench. Look across the crest of the curve and down the area where the cloth hangs. One fabric may reflect more light at the crest while the other shows the motif more clearly in the section below. A flat cover is seen from different angles than a draped garment. Use the usual position and viewing distance of the product to judge what will be visible.

A clearer edge under the light can be a useful visual result. It can reflect stronger shadows, the orientation of the weave or a sheen difference between the motif and the ground. If you need a number for the local height difference, agree on a suitable profile method and run it through the same feature of each motif. Keep the support, direction and reporting consistent. A total thickness value covers the whole cloth, while the local profile describes a particular feature of the emboss. State which of these measures is relevant to the acceptance decision.
View an overview with the close detail. A dash that is easy to recognise in a close view may blend into the background at jacket or bag viewing distance. Another fabric may look sharper from a distance but form a stiffer fold around a curve. State which characteristic matters for the piece. If both drape and a defined motif matter, make an equivalent panel from each candidate. On a jacket front, for instance, compare the area near the body with the section that rolls towards the collar. If the supports cast different shadows, place each piece in turn on the same form before deciding. Capture a view from the usual distance to record what the reviewer actually saw.
Include the material identifier, fibre content, weave, weight, chosen face, motif direction, known finish and process conditions. In separate observations, describe which part of the dash remained visible, how the ground picked up the light and how the cloth lay on its support. If a candidate stood out at a particular angle, say how often that view occurs when the product is used. Identify the relevant section, such as the front panel, collar or outer face of a bag. For a design that uses both foreground and background details, say which one needs to stay visible from the normal review distance.
Retain the chosen physical swatch and its untreated companion when the colour or lot will change. When the new fabric arrives, compare the unfinished surfaces and confirmed finish information first. Make another small emboss trial if needed. Review the new result with the approved sample in the same direction and light. Keep the approval tied to the design, materials and conditions actually reviewed. At the next sample meeting, the team can show which part of the appearance to preserve, which differences were accepted and which trial produced the sample on file.
phone: +90 212 576 5250
fax: +90 212 493 0336
email: info@unlutransfer.com
Yenidoğan Mah. Eser Sok. No: 6-8
Bayrampaşa, 34030,
Istanbul / Turkey
TR 9150171175
Bayrampaşa Tax Office