For quick contact: +90 532 288 2200


Align the approved swatch with the first usable fabric off the line. Check the repeat, the edges and the usable width across the full fabric.
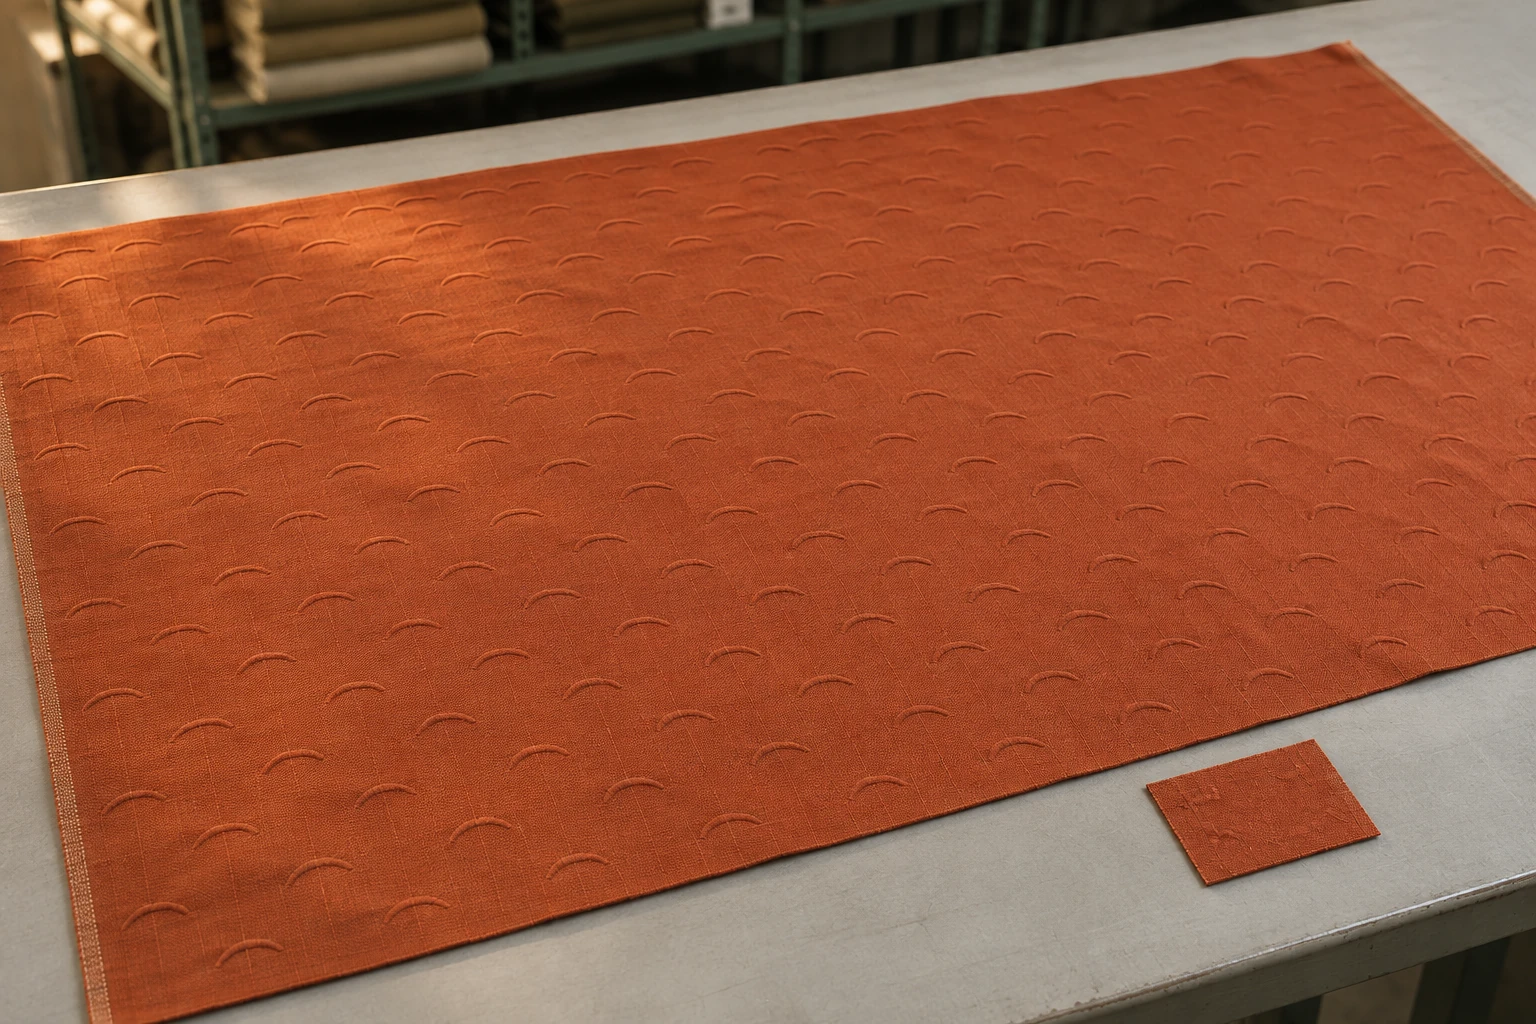
Put the approved swatch beside the first usable production length with the same face up and both motifs pointing in the same direction. Compare the same feature under fixed light. Then open the production piece to its full width and examine the left, centre and right for definition, spacing and the condition of the edges. Record the overall width and the width you can actually cut separately. The small swatch shows the appearance that was agreed. The full-width piece shows how that appearance and the usable area carry across the fabric at the start of production. Record the decision with the roll identifier, length position and inspection conditions.
Imagine a terracotta fabric embossed with small arcs. The motifs at the centre of the first production length look like the approved swatch. The arcs are also visible on the left, but some look less defined in a narrow band near the right selvage. The centre can match the reference while the usable width falls short. The material remaining after you exclude the band might be sufficient for a bag panel and too narrow for a wide seating panel. Check both requirements before committing the cloth to cutting.
Check the approved physical swatch for its code, colour, base fabric, motif and approval date. Identify the face and length direction. If there are several trials of the same design, confirm which one was approved. A photograph of a promising trial can look similar to a photograph of the final swatch. Note any variation that was explicitly accepted, such as less defined relief in one area. If the first approval covered only the feel of the fabric, find out which swatch applies to colour and motif appearance.
Identify the roll and the position of the production length. The first fabric to pass through the line may include a leader, a seam or material from setup. Choose the first usable, stable section according to the production check for the article, and record where it begins. If the repeat is larger than the available length, take a section long enough to show several full repeats when possible. Record the dimensions of the actual piece. If it includes a transition or seam, mark where the relevant comparison begins and ends.
If the approved swatch came from the centre of an earlier trial, compare it with the centre of the production piece first. Include the edges in the full-width review. If the small sample is stretched on a card, photograph its mounting. The same material may look different when it lies loosely on the bench. Use a loose matching reference if available, and document any difference in support that remains. If the base fabric lot or finish is known, check it against the production piece. Two lots with the same colour name may have different looks or feel. A piece of the base fabric before embossing can help when you need to see whether a change was already present.
Place both pieces face up with the same orientation. For an arc, use the opening, tips and middle of the curve as reference points. Compare the corresponding parts side by side. A curve turned to face the light on one swatch may cast a shadow in a different direction from the curve on the other. Start with gentle side light to read the edge of the relief. Follow with more diffuse light to compare colour and sheen. If an additional view is needed for the finished product, make a note of that view and the change in lighting.

See whether the two tips and the central curve remain distinct from the ground and from the next motif. A protruding yarn can make one repeat look different. Check several repeats before judging an entire row. The first production section might have similar arcs on the left and in the centre, with less distinct relief on the right. Record which feature differs, where it changes and under what light. If a gloss difference is visible only from one side, save that view alongside the normal product view. If a local height is required, select an appropriate method for the surface profile and identify corresponding points. Shadow in a photograph depends on the light and does not provide that measurement.
If you can fit both pieces in one view, leave a gap and set them on the same support. This lets you compare them with the same camera exposure. If one piece receives more light, swap their places without turning them and check whether the difference follows the cloth. Keep that detail view with a full-width photograph that includes both edges and the centre. If you turn the production section to take another view, mark the direction for each photograph. Left and right should still refer to the same sides when the sample is turned around.
Make an overview at the normal viewing distance as well as one close view. A distinct arc on the small swatch may fade into the ground when several rows are seen together. Follow a few rows from the centre towards each usable edge. If the shapes remain alike but the ground reflects more light in one area, describe that as a change in sheen and keep the angle with the observation.
Set out how to measure the repeat. For a row of regularly spaced arcs, measure from the centre of one arc to the centre of a later one. For example, suppose there are 100 mm between the centres of the first and sixth arcs along the same row. There are five intervals, giving an average repeat spacing of 20 mm. The count of motifs includes both endpoints, while the calculation uses the number of intervals. Repeat spacing can differ along and across the fabric. Record the direction, unit and feature used. In a staggered design, keep both endpoints in the same row when measuring along that row.
Use equivalent points for a second reading. A distance from the tip of one arc to the middle of the next includes part of the motif as well as the repeat. If the repeat appears to change in one area, measure it there and again in a nearby, more regular row. Record a partial arc at the edge separately from full repeats used for the calculation. Note how close each repeat measurement is to the line where you measured the width. The two readings can describe different positions on the same piece.
Measure the overall width from one physical edge to the other. Then measure between the boundaries of cloth that can be cut for the intended product. Selvages, pin marks, incomplete embossing or other excluded portions may fall outside that area. Keep the fabric flat without pulling it sideways. Record the reference edge, the position of the width reading and the basis for each exclusion. If the usable area narrows at one point, take an additional reading to find where the change begins and ends. Use the width agreed for the article when making the decision.

Suppose the total width is 150 cm. The excluded portion is 3 cm on the left and 5 cm on the right, leaving 142 cm of usable fabric. Those figures include the already excluded edge portions. If the panel requires at least 144 cm, this section falls short even though the emboss matches at the centre. If the band is present only at one position, check a second section to find how long the exclusion continues. Record the location and extent of the width you measured. Keep actual readings separate from the minimum in the product specification.
A cut edge may cross a motif even when the emboss looks regular. Check where the cut will fall on the fabric if the panel must contain full arcs or a particular alignment. The available span and the number of complete repeats that fit inside it are different observations. If the cut is meant to land between two arcs, mark that point on the layout. An overview shows the full area. A closer view shows whether that position is inside the agreed usable boundary and what part of the design would be visible after cutting.
Inspect the same motif on the left, in the centre and on the right. Define these positions from the physical selvage or the edge of the usable width. Indicate which feature you saw, at what distance and under which light. Note whether an edge difference reaches the cutting area. If a change is visible in the leader, check separately whether it continues into the first usable section. Where part of the emboss changes within the length examined, add a view just before and just after that point to locate the boundary. Describe the area actually inspected.
Write the appearance decision separately from the width decision. For example, the centre and left may match the accepted relief, while the right band is less defined and leaves 142 cm of usable width. Name the intended product and its required width. A separate decision can be recorded for a different cut part. If the setup is changed before another trial, identify its new first usable section and measure the same features again. Keep the sample and photographs from the first check. Record colour, sheen and definition separately when one of those features still needs review.
Where a width or appearance result is close to the agreed limit, write down the part that is affected and the next check. For example, a narrow panel may still be usable if the band can be kept outside its cut line. Verify that placement with the cutting team before accepting it. Tie any conditional decision to the particular panel and length position so it can be reviewed if the layout changes.
Keep the approved physical swatch with the identifier of the first production length and the related photographs. Include the direction, pattern version and date of inspection. Save the full-width view and the left, centre and right details. If a smaller sample is cut from the production section, write its length and width position before removing it. Keep the swatch with the appropriate lot and colour identifiers. If the sample is moved onto a different card or sent for review, keep the link to its original position and approval.
Record where the physical pieces are stored if another shift will take over. The next reviewer should be able to place them in the same orientation and repeat the width reading from the same reference. If a later roll differs, review its usable width and motif rather than applying the first decision to a new area. The first production check records the state of the section that was examined. The product’s quality plan sets the later roll or shipment checks. Keep the approved reference, inspected section, visible difference, usable width and next decision together so a later reviewer can see exactly what was accepted.
phone: +90 212 576 5250
fax: +90 212 493 0336
email: info@unlutransfer.com
Yenidoğan Mah. Eser Sok. No: 6-8
Bayrampaşa, 34030,
Istanbul / Turkey
TR 9150171175
Bayrampaşa Tax Office